Website

Internal Linking Tools Audit Your Website. They Don’t Tell You What to Do.

Reading Time: 5 minutes

Internal linking is one of those search engine optimization (SEO) topics that sounds simple until you actually try to improve it.

I have over 200 blog posts on this website. I know internal linking matters. And I still cannot find a tool that tells me what I actually need to know: which specific web page should link to which other web page, where the link belongs, and why it makes sense.

So I tried to build one myself.

That experience made the gap in existing tools much clearer.

What most internal linking tools do well

Many tools are good at the auditing side of internal linking.

They can usually tell you things like:

  1. How many internal links exist on a web page or across a website.
  2. Whether a web page appears to be orphaned.
  3. Whether anchor text is repetitive, vague, or overly generic.
  4. Whether navigation and contextual linking appear healthy at a high level.
  5. Whether there are broad internal linking patterns worth reviewing.

That kind of reporting has value. It gives a quick snapshot, helps identify obvious problems, and creates a starting point for discussion.

But that is also where many tools stop.

Where many internal linking tools fall short

Most website owners do not need another dashboard telling them they have a score of 82 out of 100 or that they should improve their navigation structure. They need help making decisions.

That means answering questions such as:

  1. Which specific web page should link to which other web page?
  2. Why is that link relevant?
  3. Where on the web page should the link be placed?
  4. What anchor text would make sense in context?
  5. Which suggested links matter most if time is limited?

This is where many tools start to break down. They are good at summarizing the condition of a website. They are much weaker at bridging the gap between diagnosis and action.

Why I tried to build this myself

After running into the same wall with existing tools, I started exploring whether I could build a solution using AI-assisted development. The idea was straightforward: take my blog post data, generate embeddings to represent topical relationships between posts, and surface specific web page-to-web page linking recommendations based on semantic similarity.

In practice, it turned out to be significantly harder than it sounds. Getting the data organized was one challenge. Building the logic to translate similarity scores into actionable recommendations, with context about where on the web page a link belongs and what anchor text would fit, was another level entirely.

The technical pieces exist. Connecting them into something genuinely useful for a working website owner is where things break down fast.

That experience gave me a clearer picture of why existing tools stop where they do. The auditing side is relatively tractable. The decision-support side requires understanding content at a level that is much harder to automate well.

The problem with surface-level internal linking metrics

Some internal linking metrics are directionally useful. They can point to potential issues. But many become less helpful when they are presented as definitive measures of quality.

Take link counts, for example. A high number of internal links on a web page does not automatically mean the web page is well linked. Those links might be mostly navigation, footer, archive, or template links. They may not help a user discover the next best piece of content or help search engines understand topical relationships in any meaningful way.

Orphan web page detection can be genuinely useful. But even here, the insight is limited unless the tool helps answer the next question: which existing web page should link to that orphaned web page, and why?

Anchor text scoring has similar limitations. It is easy to say anchor text should be descriptive. That is true. But a real tool should go further and help identify what descriptive anchor text makes sense inside the actual sentence and context of the referring web page.

Even navigation-related recommendations can drift into generic advice. Suggestions like “improve website structure,” “add breadcrumbs,” or “add a search bar” may sound strategic, but they often do little to solve the specific editorial linking decisions that content-heavy websites struggle with most.

Why website owners need more than an audit

A website owner usually is not asking, “How many internal links do I have?”

The real questions are closer to these:

  1. Which web pages on my website are under-supported?
  2. Which existing web pages are the best candidates to support them?
  3. How do I add links in a way that feels natural and helpful?
  4. Which opportunities are worth acting on first?

That is a different problem than auditing. It is a recommendation problem. It is a prioritization problem. It is also a context problem.

Without context, internal linking advice stays abstract. With context, it becomes usable.

What a truly helpful internal linking system should do

If internal linking tools are going to become genuinely useful for website owners, they need to move beyond scoring and into decision support.

A more helpful internal linking system would do at least five things well.

  1. Identify the right source and destination web pages. It should not just say a web page needs more links. It should show which existing web pages are the strongest candidates to link to it.
  2. Explain why the recommendation exists. There should be a clear rationale, such as shared topic coverage, overlapping keyword intent, supporting subtopic relationships, or complementary user journeys.
  3. Suggest where the link belongs. A recommendation is far more useful when it points to a specific paragraph, heading, or section where the link would fit naturally.
  4. Offer anchor text guidance grounded in the web page content. Not generic anchor text rules. Actual suggestions that fit the language already on the web page.
  5. Prioritize recommendations based on likely impact. Not every link opportunity matters equally. A good system should help website owners understand which fixes are high value, which are nice to have, and which can wait.

The difference between auditing and decision-making

This is the core distinction that many tools miss.

Auditing tells you what exists. Decision-making tells you what to do next.

Auditing can tell you that a website has strong internal link density, no orphaned web pages, and descriptive anchor text across most web pages.

Decision-making tells you that a post about misleading data visualizations should probably link to a related post about poor chart design, and that the best placement is in the paragraph that introduces the risks of decontextualized reporting.

One is a score. The other is useful.

This is not just an SEO problem

Internal linking is not only about search performance.

Good internal linking improves website usability, increases content discovery, supports stronger journeys across a website, and helps people move from awareness to trust to action. It can keep visitors engaged longer, connect isolated insights, and surface relevant resources they would not otherwise find.

That is why surface-level scoring is not enough. Internal linking is part SEO, part information architecture, and part editorial judgment. Any tool that ignores those realities will only solve part of the problem.

What to look for in an internal linking tool

If you are evaluating internal linking tools, it helps to ask better questions than whether the dashboard looks polished or the score seems high.

Questions worth asking include:

  1. Does this tool help me make web page-to-web page linking decisions?
  2. Does it explain why a recommendation makes sense?
  3. Does it help me place the link in context?
  4. Does it distinguish between template links and meaningful contextual links?
  5. Does it save me real time, or just give me another report to interpret?

A tool that cannot answer those questions well may still be useful for orientation, but it is probably not solving the real internal linking problem.

The bigger opportunity

The future of internal linking tools should not be more colorful scorecards or more generic advice. It should be better judgment support.

I have not found a tool that does this well yet. I am still looking, and still experimenting with building something myself, though that has proven harder than expected. What I do know is that the gap is real and the need is not complicated to describe: website owners need help moving from “I know I should improve internal linking” to “here is exactly what to change and why.”

Until more tools bridge that gap, internal linking will remain one of those areas where the theory is easy, the dashboards look impressive, and the real work still falls back on the website owner.

I am still waiting for the tool that changes that. If you have found one, I would genuinely like to know.

Internal Linking Tools Audit Your Website. They Don’t Tell You What to Do. Read More »

WordPress Security Checklist: What to Fix and What to Skip

Reading Time: 5 minutes

This WordPress security checklist is based on a real scan of my own website using WP Security Ninja. I reviewed each item, fixed the issues that made sense, skipped the ones with low practical value or higher break risk, and noted where more caution was needed.

If you are using WP Security Ninja or a similar tool, this will help you quickly decide what is worth fixing and what is not.

Want to see the tool I used for this scan? Read my full WP Security Ninja review.

Security CheckWhat It Is and Why It MattersAction I Took
WordPress core versionChecks whether WordPress is up to date. Running an outdated version can leave known vulnerabilities exposed.Passed. No action needed.
Automatic WordPress core updatesChecks whether automatic core updates are enabled. This helps important security updates apply faster.Passed. No action needed.
Plugin updatesChecks whether plugins are out of date. Outdated plugins are one of the most common WordPress risk areas.Review and update carefully. This was worth addressing, but updates should be checked for compatibility first.
Deactivated pluginsChecks whether inactive plugins are still installed. Inactive plugins can still create risk if vulnerable.Passed. No deactivated plugins were installed.
Old plugin updatesChecks whether active plugins have not been updated recently. This can indicate abandoned or poorly maintained plugins.Review manually. Not an automatic fix, but worth checking plugin quality and alternatives.
Plugin compatibility with WordPress versionChecks whether plugins are compatible with the current WordPress version. Compatibility issues can create stability or security problems.Review manually. Useful warning, but not something to fix blindly.
Theme updatesChecks whether installed themes are up to date. Outdated themes can expose vulnerabilities.Passed. No action needed.
Unnecessary themesChecks whether unused themes are installed. Unused themes can still carry risk if outdated or vulnerable.Fixed manually. I deleted the unused Builder Theme and kept Astra active.
WordPress version in meta dataChecks whether the WordPress version is shown in page meta data. This can reveal version information to scanners.Passed. No action needed.
Windows Live Writer linkChecks whether the Windows Live Writer link is present in header data. This is usually unnecessary for modern websites.Passed. No action needed.
PHP versionChecks whether the website is using a current PHP version. Older PHP versions can create performance and security risks.Passed. No action needed.
MySQL versionChecks whether the MySQL or MariaDB version is current enough for stable performance and security.Passed. No action needed.
Database table prefixChecks whether the database uses the default wp_ prefix. Changing it can reduce predictability, but the practical security benefit is usually small on an existing website.Skipped. Low practical benefit and higher break risk on a live website.
Server PHP version exposedChecks whether server response headers reveal the PHP version. Revealing version details can give attackers extra information.Left for later. Worth fixing eventually, but not urgent compared with higher-impact items.
Expose PHP directiveChecks whether expose_php is enabled. This can reveal PHP information in server headers.Left for later. Useful cleanup, but not a top priority.
Admin usernameChecks whether a user with the username admin exists. This can make brute force attempts easier.Passed. No admin username was found.
Anyone can registerChecks whether open registration is enabled. Open registration can create spam or account abuse risk if not needed.Passed. Registration is not open.
User ID 1Checks whether a user with ID 1 exists. This is a minor predictability signal, not usually a major standalone risk.Passed. No issue found.
Failed login informationChecks whether failed login attempts reveal unnecessary information. Specific login errors can help attackers validate usernames.Passed. No detailed failed login information was shown.
wp-config.php permissionsChecks whether wp-config.php has strict file permissions. This file contains sensitive configuration details.Fixed. Changed permissions from 644 to 440.
wp-config.php default locationChecks whether wp-config.php is in the default location. Moving it can add obscurity, but can also break things if done incorrectly.Skipped. Not worth the risk for this website.
Database password strengthChecks whether the WordPress database password is strong. Weak database credentials increase risk if another layer is compromised.Passed. No action needed.
Security keys and saltsChecks whether WordPress security keys and salts are set correctly. These help secure cookies and authentication.Passed. No action needed.
Age of security keys and saltsChecks whether security keys and salts are reasonably current. Rotating them can invalidate sessions if needed.Passed. No action needed.
WP_DEBUG enabledChecks whether WordPress debug mode is enabled. Debug mode can expose sensitive information if active on a live website.Skipped for now or review manually. This should normally be disabled on a live website.
Debug log fileChecks whether the WordPress debug log exists. A public or exposed debug log can leak sensitive information.Passed. No unexpected debug log file was found.
Database debug modeChecks whether database debugging is enabled. This can expose database information and create risk.Skipped for now or review manually. This should normally be disabled on a live website.
JavaScript debug modeChecks whether script debug mode is enabled. This is not recommended for production websites.Passed. No action needed.
PHP display errorsChecks whether PHP errors are displayed publicly. Public errors can reveal file paths and configuration details.Passed. No action needed.
WordPress installation addressChecks whether the WordPress address and website address match. Mismatch issues can cause configuration or redirect problems.Passed. No action needed.
register_globals PHP directiveChecks whether register_globals is disabled. This is an old PHP security setting that should not be enabled.Passed. No action needed.
PHP safe modeChecks whether PHP safe mode is disabled. Safe mode is obsolete and not part of modern recommended PHP setup.Passed. No action needed.
allow_url_includeChecks whether remote file includes are allowed. Enabling this can create serious security risk.Passed. No action needed.
Plugin and theme file editorChecks whether the WordPress plugin and theme file editor is enabled. If an attacker gets admin access, the editor can make damage easier.Fixed. Disabled the file editor.
Uploads folder browsingChecks whether the uploads folder can be browsed directly. Directory browsing can expose file structure.Passed. No action needed.
Application passwordsChecks whether application passwords are enabled. Application passwords can be useful, but should be managed carefully.Passed. No action needed.
MySQL server external accessChecks whether the MySQL user can connect from outside the server. Broad external database access can increase risk.Review with host. This is usually a hosting-level setting, not something I would change casually in WordPress.
EditURI XML-RPC linkChecks whether the EditURI XML-RPC link is exposed in header data. This advertises an endpoint most websites do not need.Fixed. Removed or reduced exposure using the built-in fix.
TimThumb scriptChecks whether TimThumb exists in the active theme. Older TimThumb scripts have a history of security issues.Passed. No TimThumb script was found.
Shellshock 6271Checks whether the server appears vulnerable to a known Shellshock test. Shellshock is a serious server-level vulnerability.Passed. No vulnerability detected.
Shellshock 7169Checks another Shellshock vulnerability pattern. This is a server-level security check.Passed. No vulnerability detected.
Admin interface SSLChecks whether the admin area is delivered over SSL. Admin login and dashboard traffic should be encrypted.Passed. Admin pages are secured by SSL.
Database account permissionsChecks whether the MySQL account used by WordPress has excessive permissions. Overly broad database permissions can increase damage if compromised.Passed. No action needed.
User ID enumerationChecks whether usernames can be fetched by looping through user IDs. User enumeration can help attackers identify login targets.Passed. Usernames were not exposed through this method.
REST API links in codeChecks whether REST API links are visible in source code. This can expose API endpoints, but REST API use is normal for WordPress.Skipped. Normal WordPress behavior and not automatically a problem.
X-Content-Type-Options headerChecks whether the X-Content-Type-Options header is set. This helps prevent MIME-type sniffing.Passed. Header was present.
X-Frame-Options headerChecks whether X-Frame-Options is set. This helps reduce clickjacking risk.Passed. Header was present.
Strict-Transport-Security headerChecks whether HSTS is set. This helps browsers enforce HTTPS connections.Passed. Header was present.
Referrer-Policy headerChecks whether a Referrer-Policy header is set. This controls how much referrer information is shared.Passed. Header was present.
Permissions-Policy headerChecks whether Permissions-Policy is set. This can limit access to browser features like camera, microphone, and geolocation.Passed. Header was present.
Content Security Policy headerChecks whether a CSP header is set. CSP can reduce cross-site scripting risk, but poor configuration can break scripts, analytics, ads, or embeds.Left for later. Valuable, but not something I would rush without testing.
REST API enabledChecks whether the REST API is enabled. The REST API is normal WordPress functionality and is not automatically a security issue.Skipped. Not treated as urgent.
Unwanted files in root folderChecks whether unnecessary files are present in the root folder. Unneeded files can expose information or create clutter.Passed. No unwanted files were found.

This is not a universal security prescription. It is a practical decision log from one WordPress website. Use it as a starting point and validate changes against your own setup.

WordPress Security Checklist: What to Fix and What to Skip Read More »

WP Security Ninja Review: WordPress Security Scanner With One-Click Fixes

Reading Time: 5 minutes

I installed WP Security Ninja, ran a scan on my own WordPress website, and fixed several real issues in under an hour. No developer needed.

That is the pitch. Here is the honest version.

WP Security Ninja is a fast WordPress security scanner that helps identify issues and apply practical fixes with firewall protection, malware scanning, login protection, event logging, and guided fixes. It is not a complete security solution, and no single piece of software should be treated that way. But it helped me find issues worth fixing, apply several of them in one click, and think more clearly about what I was actually leaving exposed.

The bigger lesson from using it: not every failed check deserves the same response. The tool gives you visibility. Your job is to use judgment.

See the current AppSumo deal for WP Security Ninja

Affiliate disclosure: If you purchase through my link, I may earn a small commission at no additional cost to you. I only share tools I have used myself.

Is WP Security Ninja Right for You?

Good fit: WordPress website owners who want to scan their website, find common security gaps, and apply safe fixes without hiring a developer. Especially useful for bloggers, website owners, consultants, and solo operators managing their own WordPress setup.

Not the right fit: anyone expecting one plugin to handle their entire security posture. It also may feel basic for advanced users who already manage server rules, security headers, firewall configuration, login protection, malware scanning, backups, and hardening manually.

Pricing: WP Security Ninja was available on AppSumo with lifetime access at the time of this review. Check the current deal page for tiers and availability, as AppSumo pricing can change.

My Scorecard

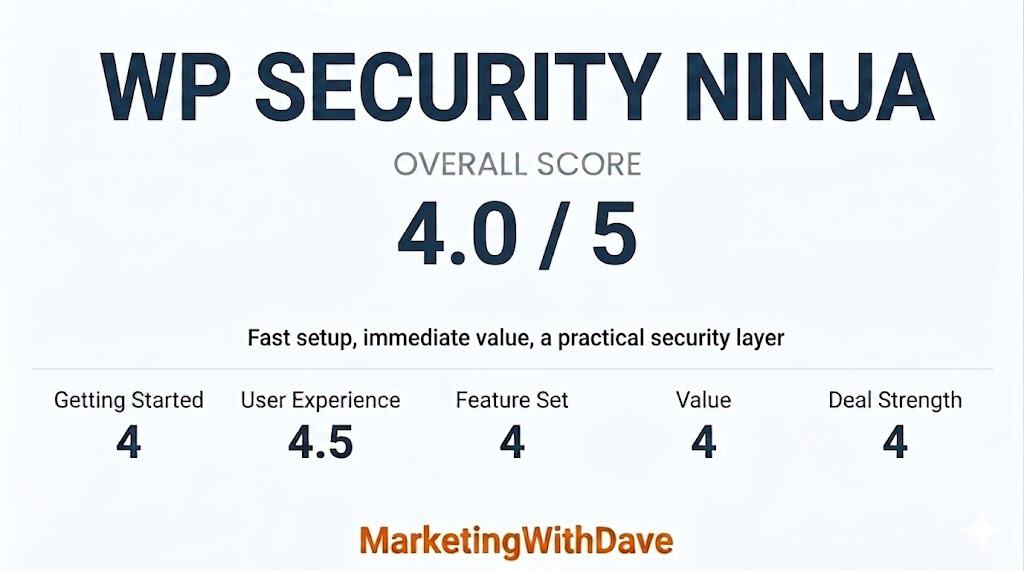
See how this score is calculated

Here’s how to interpret this score:

The overall score reflects both product quality and how compelling the current deal is.

The 4.1 reflects strong immediate value as a WordPress security audit tool with helpful explanations and practical one-click fixes, balanced by the need for judgment when applying recommendations and a feature set that works best as part of a broader security setup.

My Actual Scan Results

These results are from my own WordPress website.

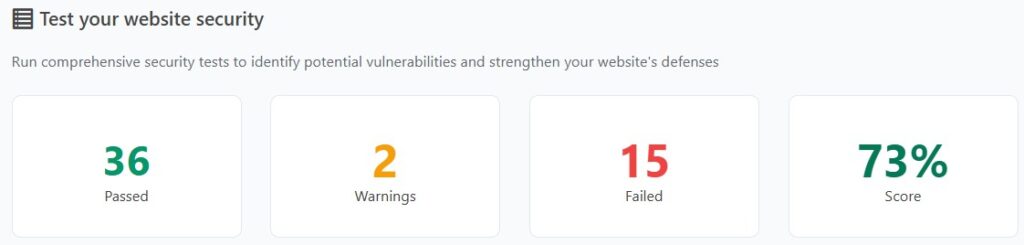
Results from initial scan

After running the initial scan, WP Security Ninja returned a mix of passed checks, warnings, and failures. Some were obvious fixes. Some required judgment. A few were the kind of recommendations I would not apply without thinking carefully first.

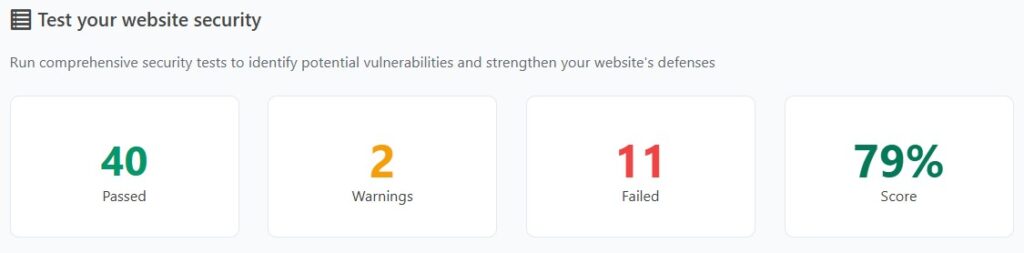
My WP Security Ninja scan results after applying the fixes that made sense for my setup.

What I Fixed and Why

IssueWhy It MattersWhat I Did
XML-RPC exposedCan be abused by bots and brute force attempts if you do not need it.Used the built-in fix to reduce exposure.
Plugin and theme file editor enabledIf an attacker gets admin access, the file editor makes damage easier.Disabled it in one click.
wp-config.php permissions too openThis file contains database credentials and other sensitive configuration details.Changed permissions from 644 to 440.
Unused theme installedInactive themes can still carry security risk if outdated.Deleted it manually.
Weekly backups onlyA weekly backup can leave too much recovery gap if something breaks midweek.Switched to daily backups using my existing backup plugin.

What I Skipped and Why

This is where the tool requires judgment, not blind trust.

IssueWhy I Did Not Rush to Fix ItMy Call
Moving wp-config.phpRestructuring folder paths on a live website can break things you did not expect.Skipped it.
Changing the database table prefixLow practical security benefit. Higher risk of breaking something on an existing website.Skipped it.
Content Security Policy headerValuable when configured correctly, but easy to break analytics, embeds, ads, or scripts if handled poorly.Left it for later.
REST API enabledNormal WordPress behavior. Not an automatic problem.Not treated as urgent.
WordPress version visibleBots targeting WordPress already assume it is WordPress. This is low priority.Did not chase it.

Want the full breakdown?
See my complete WordPress security checklist with every item I reviewed and what I chose to fix or skip.

The Strongest Part: Useful One-Click Fixes

I know enough about WordPress security to know it matters. I also know I am not a developer and if it wasn’t for vibe coding, I still wouldn’t be coding. That gap is exactly where WP Security Ninja is useful.

Disabling the file editor, tightening wp-config.php permissions, and reducing XML-RPC exposure were clear wins. They were fast, explained well enough to understand the risk, and did not require manually editing configuration files.

This is where the product delivers on the AppSumo positioning. You install the plugin, run the wizard, scan your website, review the failed checks, and apply some fixes directly from the dashboard.

One feature to note: the Security Advisor AI requires WordPress version 7 that is not currently available. I focused this review on what the product delivers today.

Check current WP Security Ninja pricing on AppSumo

Beyond the Scan: Firewall, Malware, Login Protection, and Logs

The security test is only one part of the product. WP Security Ninja also includes firewall protection, malware scanning, login form protection, event logging, and blocking features for suspicious activity.

The login protection is especially relevant because brute force attempts are one of the most common issues WordPress website owners have to think about. Features like failed-login blocking, login error hiding, and login URL changes are practical additions if you are trying to reduce obvious attack paths.

While the scan helps identify issues, these features are what continue working in the background. The firewall and login protection are designed to reduce common attack attempts, even if you do not actively monitor them day to day.

The Part That Requires Caution

The tool presents failed checks in a way that can make every item feel equally urgent. They are not.

Changing a database prefix on a live website is a good example. It sounds like a meaningful security improvement. In practice, the benefit is minimal and the risk of breaking something is real. A failed check on that item does not mean you should rush to fix it.

The scanner is useful. The score is a helpful starting point. But you still need to think about which fixes make sense for your specific setup before applying them.

What WP Security Ninja Does Not Replace

WP Security Ninja does not replace strong passwords, regular plugin updates, off-website backups, quality hosting with server-level protection, or a broader security layer like Cloudflare.

It works best as a fast audit and hardening tool alongside those basics, not instead of them.

Bottom Line

WP Security Ninja helped me find real issues on my own WordPress website and fix several of them in under an hour. The one-click fixes for file editor access, wp-config.php permissions, and XML-RPC exposure alone made it worth the install.

The score is not the goal. The goal is understanding which issues on your specific website are worth fixing, which ones are safe to apply quickly, and which ones look scarier than they are.

If you own a WordPress website and want a practical way to audit and harden your setup without it becoming a development project, WP Security Ninja is worth a look.

Just do not confuse a cleaner scan with complete security.

See the WP Security Ninja AppSumo deal

This content is for educational purposes and reflects my experience, review of the product, and current publicly available deal information. Always evaluate tools based on your specific business needs, goals, and workflows before making a decision.

Looking for more marketing software reviews? See my full list of marketing tools and software I recommend.

WP Security Ninja Review: WordPress Security Scanner With One-Click Fixes Read More »

AI-Powered Image Alt Text Optimization: Improve SEO and Accessibility Without Manual Work

Reading Time: 4 minutes

Image alt text still matters. Writing it manually does not.

If your website has dozens or hundreds of images, opening each one individually in the Media Library is not a realistic workflow. A better approach is to export the image records you need, use AI to generate baseline alt text in bulk, review the output, and update the records back into WordPress.

This walkthrough focuses on WordPress, but the core workflow applies more broadly to any content management system that allows export, bulk processing, and structured updates. The exact tools may vary, but the process stays the same: export the right fields, generate alt text in bulk, review the results, and apply the updates cleanly.

Why image alt text still matters

Alt text serves two practical purposes.

  1. Accessibility. Screen readers rely on alt text to describe images to users who cannot see them.
  2. Image context. Search engines use image-related signals such as file names, surrounding content, and alt text to better understand what an image represents.

Alt text is not a magic search engine optimization lever by itself, but missing alt text at scale is still a quality gap worth fixing.

Why you should not be doing this manually

Most website owners and marketers do not have an alt text problem. They have a workflow problem.

The old method is to open each image, write alt text one at a time, save it, and repeat until you lose momentum. That might work for a small batch, but it does not scale when a website has years of accumulated content.

The better goal is baseline coverage at scale.

That means using AI to get from zero to good enough, then manually refining only the images that matter most, such as featured images, charts, infographics, product images, and images on high-traffic web pages.

What image fields are worth caring about

If you are exporting image-related data, keep your focus narrow. Alt text is the main field worth solving first.

  1. ID. This makes importing or matching updates much easier and safer.
  2. Image URL or file path. This usually contains the file name, which often gives AI enough context to generate a usable baseline alt text value.
  3. Alt Text. This is the field you want AI to fill or improve.
  4. Title. Optional. This can be cleaned up later, but it is lower priority than alt text.
  5. Caption. Optional. Only useful if captions actually appear on your web pages.
  6. Description. Usually not worth the effort unless you have a specific reason to maintain it.

If you want the simplest, highest-return workflow, export ID, image URL, and Alt Text.

What to export from WordPress

You do not need a perfect media export to make this work. In many cases, exporting the image data tied to posts or web pages is enough to create a strong first pass.

Your export should include these columns:

  1. ID
  2. Post title or web page title if available
  3. Image URL
  4. Existing Alt Text
  5. Optional fields such as Title or Caption if you want to address them later

The key requirement is simple. Your export needs to give AI enough information to infer what each image likely is, and enough structure for WordPress to match each record during the update process.

What AI is actually doing here

This method works because many website image files already contain useful context in the file name.

For example:

digital-marketing-roundup-2026-march.jpg

becomes:

Digital marketing roundup March 2026 infographic

That is not perfect human-crafted alt text, but it is far better than leaving the field blank, and it can be generated at scale quickly.

The challenge is not generating alt text. The challenge is structuring and applying it correctly.

The practical workflow

  1. Export the image-related records from WordPress.
  2. Make sure the file includes ID, Image URL, and Alt Text.
  3. Upload the CSV or spreadsheet to an AI assistant.
  4. Ask AI to generate concise, human-readable alt text for each row based on the image URL or file name.
  5. Review the output and flag any vague or inaccurate entries.
  6. Update the file back into WordPress using the most reliable method available in your setup.
  7. Spot check a sample of records after the update to confirm the changes worked.

How to make this work in WordPress without paid import plugins

In practice, importing alt text back into WordPress is where most workflows break.

After testing multiple approaches, the most reliable method is to update image alt text directly using a simple one-time script.

Step 1: Restructure your data

Your file must have one image per row:

imageurl, alttext

Step 2: Upload your CSV file

Upload the file to your Media Library and copy the file URL.

Step 3: Run a one-time update script

add_action('admin_init', function() {
    if (!current_user_can('manage_options')) return;

    $csv_url = 'YOUR_CSV_FILE_URL_HERE';
    $response = wp_remote_get($csv_url);
    if (is_wp_error($response)) return;

    $csv = wp_remote_retrieve_body($response);
    if (!$csv) return;

    $lines = preg_split('/\r\n|\r|\n/', trim($csv));
    if (!$lines || count($lines) < 2) return;

    $rows = array_map(function($line) {
        return str_getcsv($line, ',', '"', '\\');
    }, $lines);

    array_shift($rows);

    foreach ($rows as $row) {
        if (!is_array($row) || count($row) < 2) continue;

        $image_url = trim($row[0]);
        $alt_text = trim($row[1]);

        if (!$image_url || !$alt_text) continue;

        $attachment_id = attachment_url_to_postid($image_url);

        if ($attachment_id) {
            update_post_meta($attachment_id, '_wp_attachment_image_alt', $alt_text);
        }
    }
});

After running this once, disable the script.

Where this breaks down and how to avoid it

This is where you can lose hours if you get it wrong.

  1. Multiple images in a single row
    Fix: Ensure one image URL per row.
  2. Truncated image URLs
    Fix: Verify full paths are intact.
  3. Import tools blocking custom fields
    Fix: Update directly via _wp_attachment_image_alt.
  4. Mismatch with WordPress structure
    Fix: Match using image URL to attachment ID.
  5. Over-optimizing low-impact fields
    Fix: Focus on alt text first.
  6. Trying to fix everything at once
    Fix: Prioritize high-impact images.

Final takeaway

Image alt text is still worth having, but the solution should be more automated than manual.

Export the data, generate a baseline with AI, apply updates cleanly, and move on.

Better coverage, less friction, and a workflow you can actually repeat.

AI-Powered Image Alt Text Optimization: Improve SEO and Accessibility Without Manual Work Read More »

why adding a last updated date to your content improes seo, trust, and ai visibility

Why Adding a “Last Updated” Date to Your Content Improves SEO, Trust, and AI Visibility

Reading Time: 5 minutes

Adding a last updated date to your website content is a small change, but it can send a strong signal to readers, search engines, and AI systems. For content that covers SEO, analytics, AI, digital marketing, and other fast-changing topics, showing that a web page is actively maintained can help reduce doubt before someone even starts reading.

I resisted this idea for a long time because I do not like dating content. A publish date can make something useful look old even when the guidance is still accurate. A last updated date feels different. It does not emphasize age. It emphasizes maintenance.

why adding a last updated date to your content improes seo, trust, and ai visibility

Why a Last Updated Date Matters

When someone lands on a blog post, they often make a quick judgment before reading the first paragraph. They scan the title, the topic, the reading time, and any other metadata near the top of the article. If they see a clear last updated date, that helps answer an immediate question: is this still relevant?

That same signal can also help search engines and AI-driven retrieval systems better understand that your content is current enough to consider. It is not the only factor that matters, but it is a useful one, especially for topics where recency can influence trust and rankings.

Benefits of Showing a Last Updated Date

A visible last updated date can help in several ways:

  • It gives readers a quick trust signal that the content is being maintained.
  • It supports freshness signals for search engines on topics where recency matters.
  • It may improve the likelihood that AI systems view the content as current and relevant.
  • It gives you a better alternative to a publish date if you want content to feel maintained rather than aged.
  • It creates a natural reason to review and improve older web pages over time.

For evergreen content, that last point matters more than it might seem. Even foundational articles usually need updates over time. A framework web page may still need a revised example, a new screenshot, a better internal link, or a more current explanation. A last updated date supports that reality better than a static publish date.

Why This Can Matter for AI Visibility

As more people use AI tools to research, compare, and summarize information, signals of maintenance are becoming more important. These systems are not just evaluating relevance. They are also trying to determine which sources are current enough to trust.

In many cases, your content is not competing against one clearly better result. It is competing against several sources that are all “good enough.” When that happens, smaller signals can influence which source gets selected.

If two articles are similarly relevant, similarly structured, and cover the same topic, the one that appears more current may have an advantage. A clear last updated date does not guarantee selection, but it can help break ties.

This is not about chasing freshness for the sake of it. It is about making real maintenance visible. If you are already improving your content over time, a last updated date is one of the simplest ways to signal that.

Why I Prefer Last Updated Over Publish Date

A publish date tells readers when a piece of content first went live. Sometimes that is useful, especially for news, announcements, and time-sensitive commentary. But for many educational articles, a publish date can work against you. It may create the impression that the content is outdated, even when it has been improved several times since then.

A last updated date shifts the emphasis. Instead of saying, “this was created a long time ago,” it says, “this has been reviewed and improved.” That is a better fit for many how-to articles, resource web pages, and evergreen blog posts.

How to Add a Last Updated Date in WordPress

If your website runs on WordPress, this can usually be done automatically. WordPress already stores the modified date for posts and web pages. The main decision is whether you want to display it with a plugin, a theme setting, or a custom snippet.

One easy option is to use a code snippets plugin such as WPCode Lite. That lets you add a small PHP snippet without editing your theme files directly. It is a practical approach if you want control over the wording, placement, and formatting.

Here is the PHP snippet I used to add a “Last updated” line above the content while excluding the front page and blog index:

add_filter( 'the_content', 'mwd_add_last_updated_date' );

function mwd_add_last_updated_date( $content ) {

    // Only run on the main front-end content area
    if ( ! is_main_query() || ! in_the_loop() || is_admin() ) {
        return $content;
    }

    // Show only on single posts and regular pages
    if ( ! ( is_single() || is_page() ) ) {
        return $content;
    }

    // Exclude front page and blog posts index
    if ( is_front_page() || is_home() ) {
        return $content;
    }

    $updated_date = get_the_modified_date( 'F Y' );

    $updated_html = '<p style="font-size:13px; color:#777; margin-bottom:16px; line-height:1.4;">Last updated ' . esc_html( $updated_date ) . '</p>';

    return $updated_html . $content;
}

This version uses the modified date, formats it as month and year, and places it above the article content. Because it pulls from the modified date, it updates automatically whenever the post is meaningfully revised and saved.

Other Implementation Choices to Consider

There is more than one way to handle this, and the best approach depends on your goals. Here are a few decisions worth thinking through:

  • Whether to show only the last updated date or also keep the original publish date.
  • Whether to use a full date or just month and year.
  • Whether to place the date near the top of the article or farther down the web page.
  • Whether to style it as a quiet metadata element rather than a prominent content block.
  • Whether to use a plugin or a custom PHP snippet.

In my case, I preferred month and year because it feels cleaner and less rigid than a specific day stamp. I also preferred the top-of-article placement because that is where readers already expect to see metadata like category and reading time.

A Few Best Practices

If you add a last updated date, it is worth using it thoughtfully. A few simple rules can help:

  • Only refresh the date when you make a real improvement to the content.
  • Keep the format simple and easy to scan.
  • Make sure the styling does not compete with the title.
  • Use the date as a maintenance signal, not a gimmick.
  • Review older content periodically so the signal reflects actual work.

This is especially important if you want the date to build trust. Readers do not need to know every edit you made, but the signal should still be honest.

Final Thoughts

If you have avoided dating content because you do not want your articles to look old, a last updated date may be the better compromise. It keeps the focus on maintenance rather than age, supports trust, and may help your content stay more competitive in both search and AI-driven discovery.

It is not a magic fix, and it does not replace good content, strong internal linking, or meaningful updates. But it is one of those small changes that can quietly strengthen the way your content is perceived.

For many websites, that makes it worth considering.

Why Adding a “Last Updated” Date to Your Content Improves SEO, Trust, and AI Visibility Read More »

404 Page Not Found Tracking in GA4: Capture Broken URLs and Referrers with GTM

Reading Time: 3 minutes

When traffic reaches a web page titled “Page not found” in Google Analytics 4, you know something went wrong, but you usually do not know much else.

Which URL was requested? Did the visitor come from your own website, another website, or bot traffic? Was it a real broken link or just noise?

That is the gap this setup solves. With a small Google Tag Manager and GA4 configuration, you can capture the attempted URL and referrer whenever a 404 web page loads. That gives you the context needed to diagnose the issue and decide what to do next.

404 tracking in ga4 - capture urls and referrers with google tag manager

What this setup captures

This setup sends a custom GA4 event called page_not_found whenever a 404 web page loads.

Along with the event, it sends the full attempted URL, the requested path, and the referrer. That means you can see what the visitor tried to access and where they came from.

Instead of seeing only a generic “Page not found” title in your reports, you can see the actual destination that was requested.

Why better 404 tracking matters

Some 404s are real problems. They can reveal broken internal links, outdated destinations, or incorrect external links that cost traffic and hurt user experience.

Others are just noise, such as bots requesting junk URLs that never existed.

The goal is not to treat every 404 the same. The goal is to capture enough context to know which ones deserve action.

How to set up 404 tracking in Google Tag Manager

The first step is identifying your 404 web page condition. On many WordPress websites, the browser title contains the phrase “Page not found.” If that is true on your website, you can use it as your trigger condition.

If you do not already have a Page Title variable available, create one in Google Tag Manager as a JavaScript Variable using:

document.title

Next, create a new trigger in Google Tag Manager.

Name the trigger something like:

404 - Page Not Found

Set the trigger type to:

Page View

Choose:

Some Page Views

Then use this condition:

Page Title contains Page not found

That tells GTM to fire only when a 404 web page loads.

How to send the 404 event to GA4

After the trigger is in place, create a new GA4 Event tag in Google Tag Manager.

Name it something like:

GA4 - 404 Error

Use your existing GA4 configuration tag.

Set the event name to:

page_not_found

Then add these event parameters:

page_location = {{Page URL}}

page_path = {{Page Path}}

referrer = {{Referrer}}

Attach the 404 - Page Not Found trigger to the tag and publish the container.

At that point, GA4 will start receiving a dedicated 404 event with enough context to investigate what happened.

How to build the GA4 report

The easiest long-term approach is to build an Explore report in GA4 focused only on the page_not_found event.

Go to Explore and create a Free Form exploration.

Add these dimensions:

Event name

Page path and screen class

Add this metric:

Event count

Then apply a filter where:

Event name exactly matches page_not_found

This gives you a simple report showing which broken URLs are being requested most often.

Once data is flowing, add referrer-related dimensions if they are available in your property.

How to interpret the data

Once 404 tracking is live, the next step is deciding what kind of problem each broken URL represents.

If you see a clean-looking path that resembles a real article, category, or resource, that is often a legitimate issue. It may be an outdated internal link, a changed URL, or an old destination that still receives traffic.

If you see a bad path with an external referrer, that usually points to an incorrect backlink. In many cases, a redirect is the right fix.

If you see bizarre paths that never looked like real website content, especially with no meaningful referrer, that is often just spam or automated scanning. In those cases, the right action may simply be to ignore it.

What action you can take from this data

The value of better 404 tracking is that it gives you a short list of decisions instead of a vague warning.

If the broken URL is caused by a bad internal link, fix the source link.

If the URL used to exist and still gets meaningful traffic, consider a 301 redirect.

If the request comes from another website, decide whether the traffic is worth recovering with a redirect.

If the path is obvious junk, treat it as noise and move on.

Why this setup is worth it

Out of the box, GA4 can tell you that a 404 happened. This setup tells you what was requested and where it came from.

That makes it easier to fix broken internal links, recover traffic with redirects, and ignore junk requests that do not matter.

It is a small implementation, but it turns vague 404 reporting into something you can actually use.

404 Page Not Found Tracking in GA4: Capture Broken URLs and Referrers with GTM Read More »