Website

categorizing referring domain data in ga4 using google tag manager 1

Categorizing Referring Domain Data in GA4 Using Google Tag Manager

Reading Time: 4 minutes

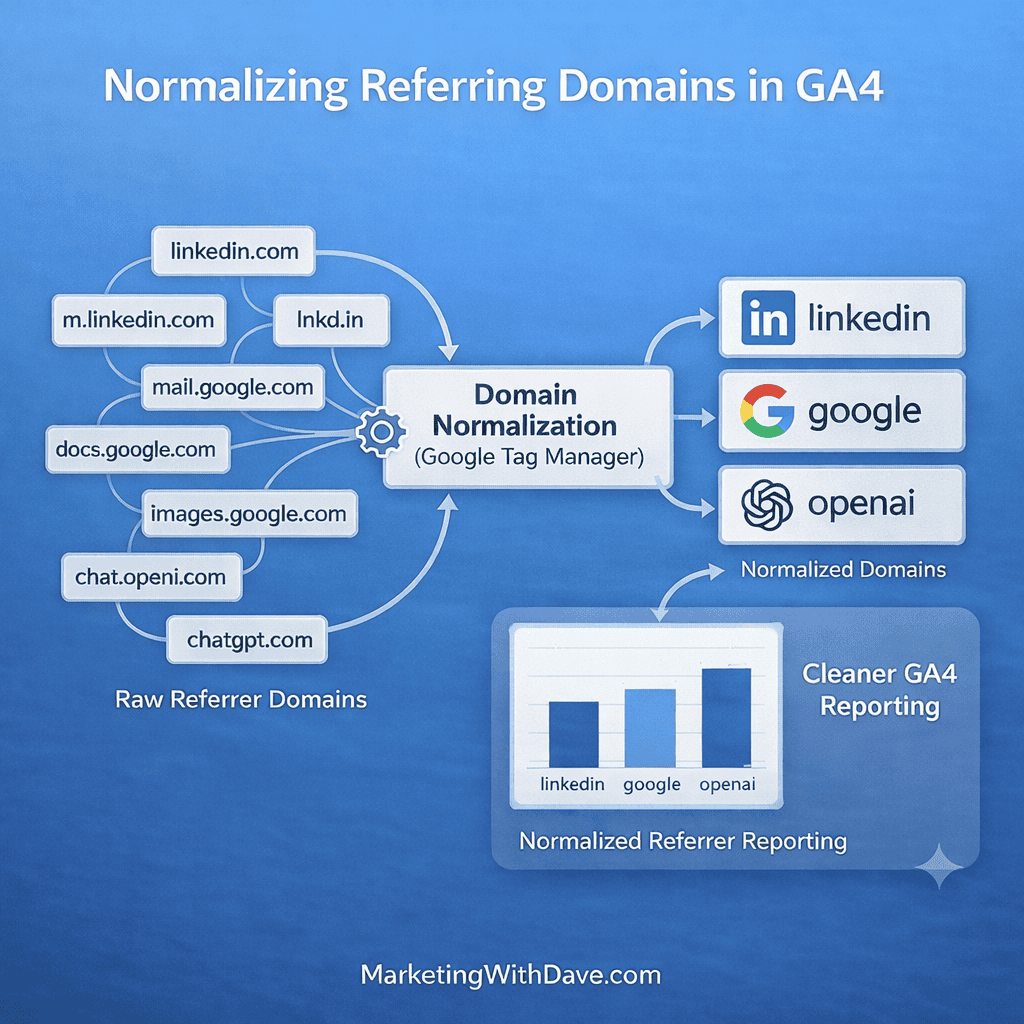
Google Analytics (GA4) provides useful traffic source reporting, but referring domain data can quickly become messy. The same platform may appear in multiple forms such as linkedin.com, www.linkedin.com, or lnkd.in. Google referrals may appear as google.com, mail.google.com, or docs.google.com.

When these variations are not cleaned up, referral reporting becomes fragmented. Instead of clearly seeing which platforms drive traffic, analytics reports fill up with dozens or even hundreds of inconsistent domains.

This article explains how to categorize referring domain traffic in GA4 using Google Tag Manager. The approach normalizes messy referrer values and assigns them to clear traffic categories such as social platforms, search engines, internal traffic, AI tools, or spam domains.

The result is much cleaner referral reporting and a much easier way to analyze where your traffic actually comes from.

The Problem With Referring Domain Data in GA4

Referring domains represent the website that sent a visitor to your website. In theory this sounds simple, but in practice the data can become messy very quickly.

One platform may appear under multiple domain variations. Mobile apps, redirect services, and shortened links can all generate slightly different referrer values. The result is fragmented reporting that makes it harder to compare traffic sources over time.

For example, LinkedIn traffic may appear under several variations.

linkedin.com
www.linkedin.com
lnkd.in

Each variation appears as a separate referrer in GA4, even though they all represent the same platform.

The same issue appears across many other platforms including Google, Pinterest, Medium, and social networks.

Normalization and Categorization Explained

This solution uses two related steps.

First, referring domains are normalized. This means multiple domain variations are cleaned into a single consistent value.

Second, those normalized values are categorized into meaningful traffic groups.

The workflow looks like this.

Raw referrer
→ Normalized domain
→ Traffic category

For example.

lnkd.in
→ linkedin
→ social

mail.google.com
→ google
→ search

marketingwithdave.com
→ internal
→ internal

startraffic.online
→ spam
→ spam

This process dramatically simplifies referral reporting.

Why Categorizing Referrers Is Valuable

GA4 already identifies traffic channels such as Organic Search, Social, and Referral. However, those channels do not always show which specific platform generated the visit.

Categorized referring domains allow you to see traffic at a much more meaningful level.

Instead of only seeing social traffic, you can more clearly separate traffic from platforms such as LinkedIn, Instagram, Pinterest, or X.

This is especially helpful if you promote content across multiple platforms and want to measure which ones actually drive visits.

It also allows you to quickly separate legitimate traffic from spam referrals or internal visits.

Categories Worth Tracking

A good first implementation should classify several common types of traffic.

Search engines such as Google, Bing, DuckDuckGo, and others.

Social platforms such as LinkedIn, Instagram, Pinterest, TikTok, Medium, Reddit, and X.

AI tools such as ChatGPT, Claude, and Perplexity. These platforms are increasingly appearing in referral data as AI assistants begin linking directly to websites.

Internal traffic coming from your own domain.

Spam domains that generate junk referrals.

Any domain not yet reviewed should fall into a category called not-classified. This makes it easier to identify domains that need to be reviewed later.

When This Approach Is Especially Useful

This setup is particularly helpful if you publish content regularly across multiple platforms.

It is also valuable if you want to identify AI-generated traffic, remove spam domains from reports, or clearly separate internal traffic from real visitors.

If you build dashboards in Looker Studio or export traffic data to spreadsheets, normalized referrer categories make analysis much easier.

Creating the Referrer Normalization Variable in GTM

The normalization logic is implemented using a Custom JavaScript variable in Google Tag Manager.

Create a new variable using the Custom JavaScript variable type and paste the following script.

function() {
  var ref = document.referrer;

  if (!ref) return 'direct';

  var host = '';
  try {
    host = new URL(ref).hostname.toLowerCase();
  } catch (e) {
    return 'not-classified';
  }

  host = host.replace(/^www\./, '');

  if (host.indexOf('marketingwithdave.com') > -1) return 'internal';

  if (host.indexOf('google.') > -1) return 'google';
  if (host.indexOf('bing.com') > -1) return 'bing';
  if (host.indexOf('duckduckgo.com') > -1) return 'duckduckgo';

  if (host.indexOf('linkedin.com') > -1 || host.indexOf('lnkd.in') > -1) return 'linkedin';
  if (host.indexOf('facebook.com') > -1) return 'facebook';
  if (host.indexOf('instagram.com') > -1) return 'instagram';
  if (host.indexOf('pinterest.com') > -1 || host.indexOf('pin.it') > -1) return 'pinterest';
  if (host.indexOf('tiktok.com') > -1) return 'tiktok';
  if (host.indexOf('medium.com') > -1) return 'medium';
  if (host === 't.co' || host.indexOf('twitter.com') > -1 || host === 'x.com') return 'x-twitter';

  if (host.indexOf('chatgpt.com') > -1 || host.indexOf('chat.openai.com') > -1) return 'chatgpt';
  if (host.indexOf('claude.ai') > -1) return 'claude';
  if (host.indexOf('perplexity.ai') > -1) return 'perplexity';

  if (host.indexOf('startraffic.online') > -1) return 'spam';

  return 'not-classified';
}

Name the variable something descriptive such as JS – Referrer Normalized.

Adding the Variable to Your GA4 Tag

Open your GA4 Google Tag or page_view tag in Google Tag Manager.

Add a configuration parameter with the following values.

Parameter name: referrer_normalized
Value: {{JS – Referrer Normalized}}

This sends the normalized value to GA4 with each page view.

Test the implementation in GTM Preview mode before publishing.

Creating the GA4 Custom Dimension

After publishing the GTM changes, create a custom dimension in GA4.

Use the following settings.

Dimension name: Referrer Normalized
Scope: Event
Event parameter: referrer_normalized

This allows the normalized value to appear in GA4 reports and explorations.

Important GA4 Limitation

GA4 custom dimensions are not retroactive. Historical referral data will not be reprocessed.

The categorized values will only appear for traffic collected after the implementation goes live.

Expanding the Classification Over Time

Your first version does not need to classify every possible domain.

Start with the platforms you already know are important. Over time, review domains that appear under not-classified and add additional rules as needed.

This gradual approach allows the classification system to evolve alongside your traffic patterns.

Visualizing the Workflow

A simple diagram can help illustrate the process.

Raw Referrer
→ Normalized Domain
→ Traffic Category

This visual representation works well as a blog image and helps readers quickly understand how the transformation occurs.

Final Thoughts

Referring domain data in GA4 often becomes fragmented and difficult to analyze. Normalizing and categorizing referrer values provides a simple way to transform messy domain data into clear traffic insights.

With a small amount of logic in Google Tag Manager, referral traffic can be organized into meaningful categories that are much easier to analyze in GA4 dashboards and reports.

If you regularly share content across multiple platforms or want to better understand where your visitors originate, categorizing referring domain traffic is one of the most useful analytics improvements you can implement.

Categorizing Referring Domain Data in GA4 Using Google Tag Manager Read More »

track page types in google analytics 4 using google tag manager

Track Page Types in Google Analytics 4 Using Google Tag Manager

Reading Time: 6 minutes

If you want better content analysis in Google Analytics 4, tracking just URLs is not enough. A list of individual web pages can tell you what got traffic, but it does not make it easy to understand which kinds of content are actually driving your website forward.

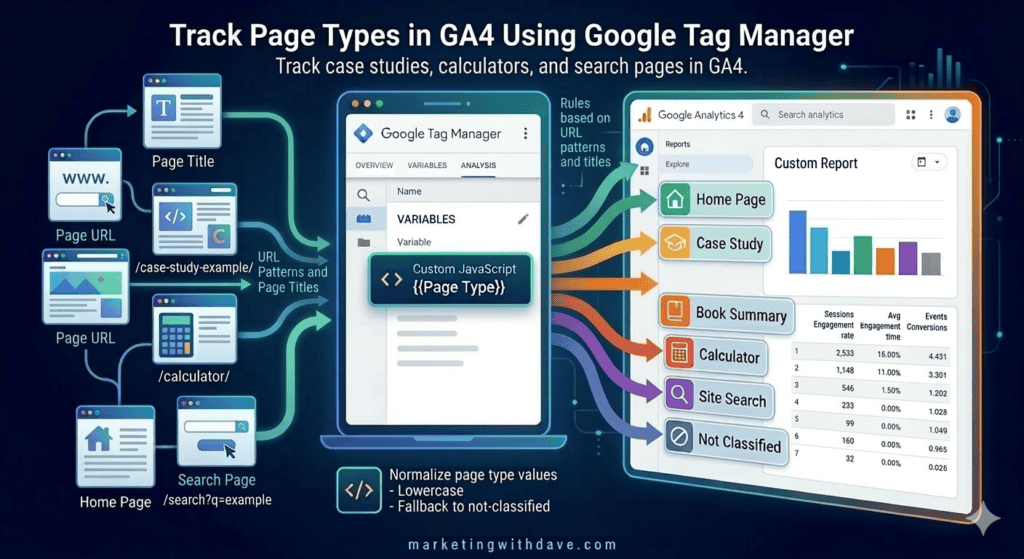
That is where page type tracking can help. Instead of only measuring individual URLs, you can classify each web page by format and send that value into GA4 as a custom parameter. This makes it possible to analyze performance by content type, such as case studies, book summaries, calculators, site search, the home page, and anything that does not yet fit into a defined bucket.

In my case, I used Google Tag Manager to identify page types based on URL patterns and page titles, then passed that value to GA4 using a custom parameter called page_type.

What page type tracking does

Page type tracking adds a structural content layer to your analytics. Instead of only seeing that a specific web page got traffic, you can now understand whether that traffic came from a case study, a calculator, a book summary, a home page visit, or some other kind of content.

Examples of page type values might include:

home-page
case-study
book-summary
calculator
site-search
404
not-classified

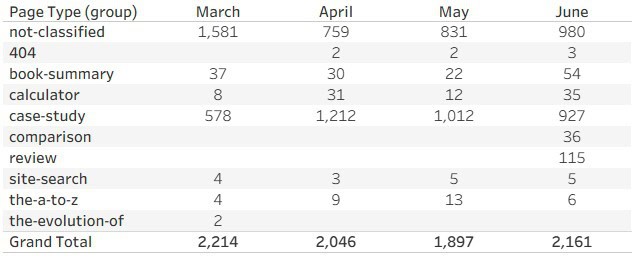
Once the custom dimension had been collecting data for a few months, I could finally analyze traffic by page type instead of individual URLs. Here’s what that report looks like on my own site.

Table showing page type data for March to June, including not-classified, 404, book-summary, calculator, case-study, comparison, review, site-search, the-a-to-z, the-evolution-of, and grand total.
Notice that “not-classified” is the largest bucket today. As I create more page type rules over time, I expect that category to continue shrinking.

Why page type tracking is useful in GA4

Once page type is available as a custom dimension, GA4 becomes much more useful for content analysis.

You can answer questions like:

  1. Which page types attract the most sessions?
  2. Which page types drive the strongest engagement?
  3. Which page types are most likely to bring in organic traffic?
  4. How much of my website still falls into a general not-classified bucket?

This becomes even more powerful when combined with topic tracking, because you can analyze both the format of the web page and the subject of the content.

Before you start

This walkthrough presumes:

1. You are using Google Tag Manager.

2. Your GA4 page_view event is firing through GTM.

3. Your website has consistent URL patterns or titles that can be used to identify different page types.

4. You want page types to be stable over time and mutually exclusive.

Why page type rules need to be precise

A page type should describe the format of the content, not the topic. For example, case study is a page type. Martech is a topic. Those are different things and should be tracked separately.

The goal is to give each web page one clear page type value. That keeps the classification stable and makes reporting easier to trust.

It is also important not to create too many page types too quickly. A small, meaningful set is usually better than trying to classify every edge case on day one.

Step 1: Define your page type values

Start by deciding which page types your website actually needs. In my setup, I used these values:

home-page
case-study
book-summary
calculator
site-search
404
not-classified

The first several values represent meaningful content structures. The final value, not-classified, acts as an intentional catch-all bucket.

Why not-classified matters

If no matching rule is found, the script returns not-classified.

This is not a mistake. It is a useful fallback. It gives you a deliberate “other” bucket so that uncategorized web pages do not get confused with GA4 system labels like not set. Over time, monitoring the percentage of sessions tied to not-classified can help you decide whether more page types are needed or whether the current taxonomy is already healthy.

Step 2: Create a Custom JavaScript Variable in Google Tag Manager

In GTM, create a new User-Defined Variable using the Custom JavaScript variable type.

Name it something like:

Page Type

Then use logic that checks the current URL path and page title to determine the correct page type.

Here is an example:

function() {

var path = window.location.pathname.toLowerCase();
var url = window.location.href.toLowerCase();
var title = document.title.toLowerCase();

if (
  title.includes("marketing with dave - all things digital marketing") ||
  title.includes("marketing with dave | all things digital marketing")
) {
  return "home-page";
}

if (title.includes("404")) {
  return "404";
}

if (url.includes("/search/?q=")) {
  return "site-search";
}

if (path.includes("case-study")) {
  return "case-study";
}

if (path.includes("book-summary")) {
  return "book-summary";
}

if (path.includes("the-a-to-z")) {
  return "the-a-to-z";
}

if (path.includes("the-evolution-of")) {
  return "the-evolution-of";
}

if (
  path.includes("calculator") ||
  path.includes("analyzer") ||
  path.includes("tools")
) {
  return "calculator";
}

return "not-classified";

}

How the script works

This script checks a small set of rules in order.

1. It looks for the home page title.

2. It checks for a 404 title.

3. It checks for a site search URL pattern.

4. It checks for specific URL structures like case-study, book-summary, the-a-to-z, and the-evolution-of.

5. It checks for calculator-related words in the URL.

6. If no match is found, it returns not-classified.

The order matters. More specific rules should always come before the fallback bucket.

Step 3: Add page_type to your GA4 page_view tag

Once the variable is created, open the GA4 page_view tag in Google Tag Manager.

If you have both a standard page_view tag and an internal version, update both so the data stays consistent.

In Event Parameters, add:

page_type = {{Page Type}}

This tells GTM to send the resolved page type value with each page_view event.

Step 4: Preview your changes in GTM

Before publishing, use Preview mode in GTM.

Visit several web pages on your website and verify that the variable returns the right values.

Examples:

A case study URL should return case-study.

A book summary URL should return book-summary.

A calculator or analyzer web page should return calculator.

The website home page should return home-page.

A regular article that does not match any defined rule should return not-classified.

Step 5: Publish the GTM container

Once Preview mode confirms the values are correct, publish the GTM container.

At that point, GTM is sending the page_type parameter to GA4, but GA4 still needs one final setup step before you can use it in reporting.

Step 6: Register the custom dimension in GA4

In GA4, go to Admin, then Custom definitions.

Create a new custom dimension with these settings:

Dimension name: Page Type

Scope: Event

Event parameter: page_type

Save the dimension.

From that point forward, GA4 will store and report on the page_type parameter.

Important note about historical data

GA4 custom dimensions are not retroactive.

This means page type data will only be available for traffic collected after the GTM changes are published and the custom dimension is created.

If you want a historical view, you would need to recreate it manually using existing URLs in a spreadsheet or another reporting layer.

How to analyze page type in GA4

Once the data starts flowing, one of the simplest and most useful reports is an Exploration showing sessions by page type.

A basic starting point is:

Rows: Page Type

Values: Sessions

This quickly shows what percentage of traffic is going to case studies, calculators, book summaries, site search, and everything else.

You can also combine page type with content topic to build a matrix like:

Rows: Content Topic

Columns: Page Type

Values: Sessions

That helps you understand both what the content is about and what format it takes.

Why this works well for content-driven websites

If your website includes multiple recurring content formats, page type tracking gives you a much better structural view of performance.

Instead of relying only on individual URLs, you can now see how the website performs by content model.

That is useful for editorial planning, content investment decisions, and identifying which kinds of web pages are becoming your strongest entry points.

Final takeaway

Page type tracking is one of the most useful content upgrades you can make in GA4. It adds a structural layer that makes your reporting far more meaningful than a simple list of URLs.

If your website already has recognizable URL patterns or stable page titles, Google Tag Manager can classify those web pages automatically and send the values into GA4 with very little maintenance required later.

And by keeping not-classified as an intentional fallback, you retain visibility into the portion of your website that still sits outside your current content taxonomy.

Track Page Types in Google Analytics 4 Using Google Tag Manager Read More »

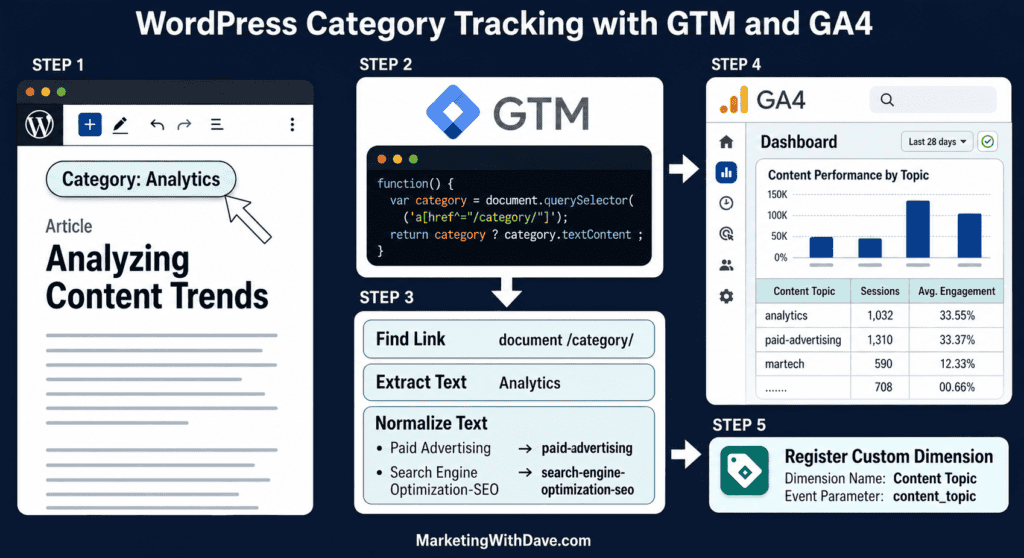
Analyzing content trends infographic showing WordPress category tracking with GTM and GA4 for marketing analytics and data-driven insights.

Setting Up WordPress Category Tracking in Google Tag Manager for GA4

Reading Time: 5 minutes

If you run a content-heavy WordPress website, there is a good chance you care about more than just web page views. You may also want to know which content topics actually drive sessions, engagement, and returning visitors.

That is where category tracking can help. In my case, I wanted Google Analytics 4 to capture the WordPress Category assigned to each article so I could analyze traffic by topic. This is especially useful when your content spans areas like analytics, martech, paid advertising, SEO, content marketing, and more.

The important detail is that WordPress Categories and WordPress Tags are different. If your website uses Categories as the main topic label on articles, your Google Tag Manager setup needs to pull from the Category link, not from a Tag link.

What this setup does

This approach reads the article’s visible WordPress Category from the web page, normalizes it into a GA4-friendly value, and sends it with your page_view event as a custom parameter.

For example:

Martech becomes martech

Paid Advertising becomes paid-advertising

Search Engine Optimization (SEO) becomes search-engine-optimization-seo

Artificial Intelligence (AI) becomes artificial-intelligence-ai

Why use Category tracking in GA4?

Once this is set up, you can analyze website performance by topic instead of just by URL.

This lets you answer questions like:

Which categories attract the most sessions?

Which categories drive the longest engagement time?

Which categories perform best for case studies, calculators, or other content types?

If you already have page type tracking in place, category tracking becomes even more powerful because you can compare format and topic together.

Before you start

This walkthrough presumes:

1. You are using WordPress.

2. Your article category appears visibly on the web page as a link.

3. The category link uses a URL structure containing /category/.

4. You already have Google Tag Manager installed.

5. Your GA4 page_view tag is firing through GTM.

Step 1: Confirm that your website uses Categories, not Tags

This part matters more than people realize.

If your website displays the topic label under the title and that label links to a URL like /category/martech/, then your GTM script should look for Categories.

If your setup uses WordPress Tags instead, the link would usually contain /tag/.

Step 2: Create a Custom JavaScript Variable in Google Tag Manager

In Google Tag Manager, go to Variables and create a new User-Defined Variable.

Choose Custom JavaScript as the variable type.

Name it something like:

Content Topic

Then use this script:

Some tutorials detect categories using URL patterns like /category/. That works on some WordPress websites, but many themes remove the category base from URLs. A more reliable approach is to target the category element directly in the HTML.

function() {
  var category = document.querySelector('.ast-terms-link a');
  if (!category || !category.textContent) return 'not-classified';

  return category.textContent
    .trim()
    .toLowerCase()
    .replace(/[()]/g, '')
    .replace(/\s+/g, '-')
    .replace(/[^a-z0-9-]/g, '')
    .replace(/-+/g, '-')
    .replace(/^-|-$/g, '');
}

Note: The selector .ast-terms-link a works for Astra theme. If you are using a different theme, inspect the category link on the web page and adjust the selector accordingly.

How the script works

This script does five things:

1. It looks for the first link on the web page that contains /category/.

2. It grabs the visible text of that link.

3. It trims extra spaces.

4. It converts the value to lowercase.

5. It removes special characters and replaces spaces with hyphens.

If no category is found, it returns not-classified.

This acts as a deliberate “other” bucket. Instead of mixing uncategorized traffic with GA4 labels like not set, you can clearly see what portion of your content taxonomy is missing or incomplete. Over time, the goal is not to eliminate not-classified, but to keep it at a healthy percentage.

Step 3: Add the parameter to your GA4 page_view tag

Next, open the GA4 page_view tag in Google Tag Manager.

If you have a standard page_view tag and a separate internal version, make sure you update both so the data stays consistent.

In the Event Parameters section, add a new parameter:

content_topic = {{Content Topic}}

That tells GTM to send the normalized category value with every page_view event.

Step 4: Preview the changes in GTM

Before publishing, use Preview mode in Google Tag Manager.

Open a few different article web pages and confirm that the Content Topic variable returns values you expect from your WordPress Categories.

For example, on a Martech article, the variable should return:

martech

On a Paid Advertising article, it should return:

paid-advertising

If you see a value that does not match one of your approved categories, your selector may be pulling from the wrong part of the web page.

Step 5: Publish the GTM container

Once preview mode looks good, publish the container.

At this point, GTM is sending the custom parameter to GA4, but Google Analytics 4 still needs one more step before you can use it in reports.

Step 6: Register the custom dimension in GA4

In GA4, go to Admin, then Custom definitions.

Create a new custom dimension with the following settings:

Dimension name: Content Topic

Scope: Event

Event parameter: content_topic

Save the custom dimension.

From that point forward, GA4 will store and report on the content_topic parameter.

Important note about historical data

GA4 custom dimensions are not retroactive.

That means this setup will only classify data collected after the custom dimension is created and GTM is published.

If you want historical analysis, you will need to build it manually using a spreadsheet or another reporting layer.

How to use the data in GA4

After the data starts flowing, the easiest place to analyze it is in Explorations.

A simple starting report is:

Rows: Content Topic

Columns: Page Type

Values: Sessions

This makes it easy to see which topics are driving traffic and how those topics map to different kinds of content.

Examples might include:

Case studies in martech

Book summaries in leadership

Articles in analytics

Calculators in website-related topics

Why this works well for WordPress websites

The biggest advantage of this setup is that it uses the taxonomy you already maintain in WordPress.

You are not inventing a separate analytics classification system. You are simply exposing your existing editorial structure to GA4.

That makes the reporting much easier to trust.

Can this work outside WordPress?

Yes, but the implementation details change.

The broader concept is the same: identify the topic label on the web page, extract it with GTM, normalize it, and send it to GA4 as a custom parameter.

What changes is the selector. Instead of looking for a WordPress Category link containing /category/, another platform might use a different class name, data attribute, or metadata element.

So the process is portable, but the selector is platform-specific.

Final takeaway

If your WordPress website uses Categories as the primary topic label for articles, GTM should pull from Categories and not Tags. That one detail can be the difference between clean, trustworthy GA4 topic reporting and a messy dataset you cannot rely on.

Once you set this up, GA4 becomes much more useful for understanding what your content is really doing by subject area, not just by individual URL.

Setting Up WordPress Category Tracking in Google Tag Manager for GA4 Read More »

Cookie Consent Management and Privacy Compliance Platform

Reading Time: 5 minutes

Most websites are running more trackers than their owners realize.

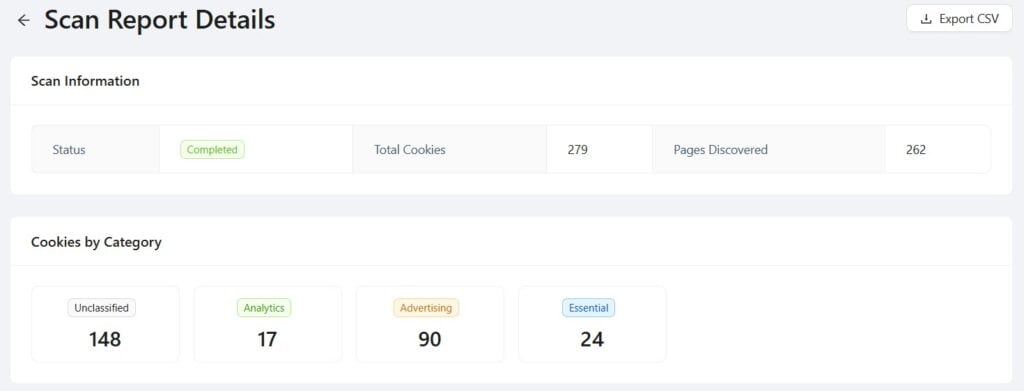
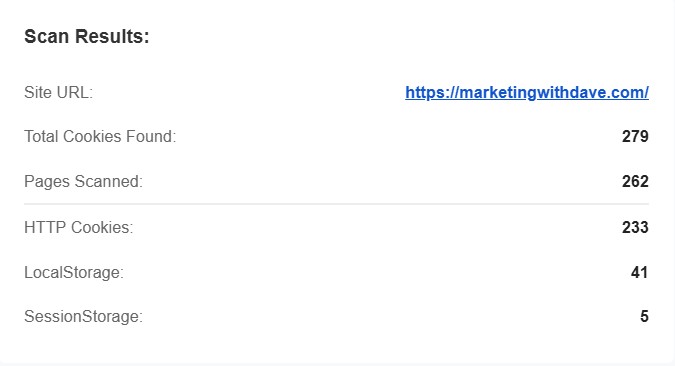
I scanned my own website and found 279 cookies across 262 pages, including 148 unclassified.

If you do not know what is running on your website, you are not actually managing it.

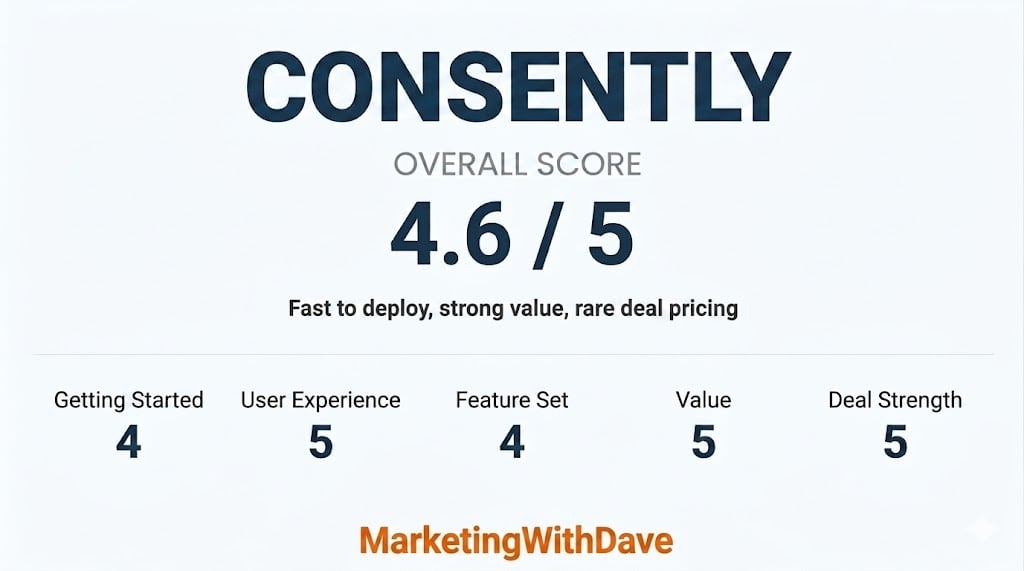
See how this score is calculated

Here’s how to interpret this score:

The overall score reflects both product quality and how compelling the current deal is.

A score in the high 4 range reflects a strong product with clear value and only minor limitations.

See the AppSumo Deal

Affiliate disclosure: If you buy through my AppSumo link, I may earn a small commission at no additional cost to you. I only share tools I believe are worth your time and consideration.

Real Results From My Implementation

These are the results from my own website after implementing Consently, not a demo or sample environment.

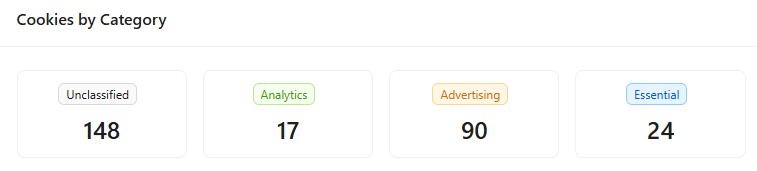
Full scan results: Total cookies, pages analyzed, and category breakdown from my website.
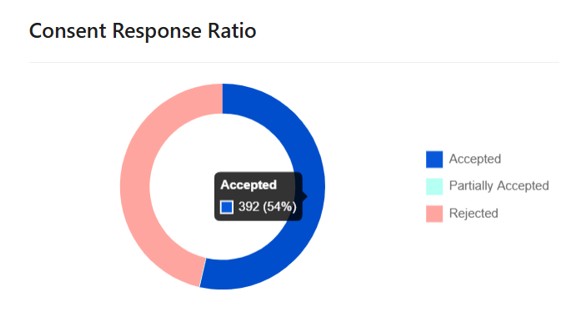
Consent rate: How users actually respond to the cookie banner after implementation.
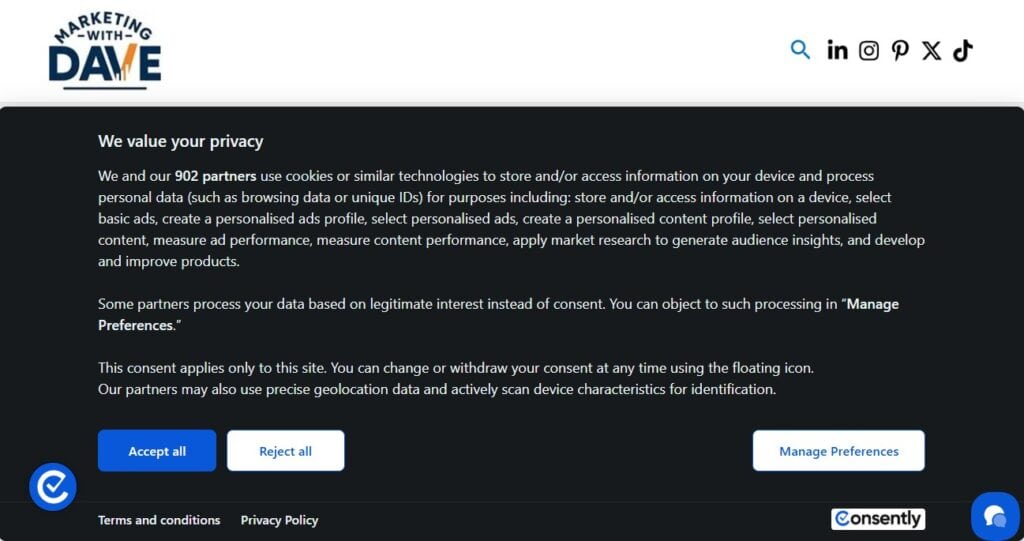
Live banner experience: What users see when they visit the website.

The 30-Second Decision

Best for: websites that want full consent coverage without turning compliance into a project

Not ideal for: enterprise teams with complex, multi-region compliance requirements at scale

Entry price: $39 lifetime for 1 domain and 100,000 monthly page views

Risk window: 60-day refund through AppSumo, versus a 14-day trial on Consently’s own website

My take: a practical “get compliant fast” tool for most websites and lean teams. Not an enterprise privacy platform, and that is exactly why it fits.

What I Found When I Scanned My Website

Here’s what Consently surfaced on my own website, and it was more than I expected.

The 148 unclassified cookies meant there was real work ahead to properly categorize them.

Consently helps close that gap with scanning, consent control, consent logging, and policy generation in one place.

This is exactly the kind of visibility most websites are missing.

See the AppSumo Deal Before It Ends

What Consently Actually Does

Consently takes you from “I do not know what is running on my website” to visibility and control.

It scans your website for cookies and third-party scripts, blocks non-essential cookies until visitors give consent, logs consent decisions in an audit-ready dashboard, and generates privacy, cookie, and terms policy pages.

It also connects with Google Analytics 4 and ad platforms so opt-outs are actually respected.

Most consent tools stop at displaying a banner. Consently lets you define which cookies are essential and which require consent, including analytics, advertising, performance, and social. That is a governance decision, not a design choice.

Consently is not just a banner tool. It is visibility into what is actually happening on your website.

Doesn’t Google Analytics 4 Already Handle This?

Not really.

Google Analytics 4 and Google Tag Manager can help configure how Google tags behave after consent is given through Consent Mode. That is useful, but it is not a consent management system.

Google Analytics 4 and Google Tag Manager Consently
Consent Mode configuration only Full consent management system
No automatic cookie scanning Automatic cookie scanning
No cookie categorization dashboard Category-level cookie classification and control
No built-in policy generator Built-in policy generation
No centralized consent log dashboard Audit-ready consent logs
Manual configuration across tools Scanning, blocking, logging, and policy generation in one dashboard

Google Analytics measures what happened. Consently controls what is allowed to happen.

Setup in Minutes

Add your website name and URL, customize your banner and preference center, then drop a single script into your website header. I deployed mine through Google Tag Manager. After that, Consently scans, logs, and generates your policy pages automatically.

Why I Would Recommend This

  1. Compliance is based on data collection, not traffic size. If you collect data, you are responsible for it. At a lifetime price, this is inexpensive risk reduction.
  2. Tracking drift is real. Expired tags linger. Short-term tests become permanent. Third-party tools introduce cookies you did not explicitly plan for. On my own website, Consently surfaced 148 unclassified cookies. That is exactly the kind of thing that accumulates without you realizing it. Regular scanning restores visibility and control.
  3. It compresses complexity for lean teams. You could try to manage consent through multiple tools and manual processes. Most teams do not. Consently centralizes scanning, consent control, logging, and policy generation into one operational layer.

What Works Well

  • Live in under 30 minutes with minimal setup
  • Automatically scans your entire website for cookies across all pages
  • Control exactly which cookies are allowed and when
  • Audit-ready consent log dashboard
  • Built-in policy page generation
  • Google Analytics 4 and ad platform compatibility
  • 60-day AppSumo refund window

Watch Out For

No CSV export for your cookie list. This is the one thing I would change and have recommended to the team. With 148 unclassified cookies, being able to export, sort, and bulk classify in a spreadsheet would save real time. Right now you are doing it one by one inside the dashboard, which becomes tedious fast at scale. That is the gap between a 4-star and 5-star tool for me.

Validate PageSpeed and overall performance impact if your website is performance-sensitive.

Some manual review is still required as your tech stack evolves.

Not built for complex, multi-region enterprise compliance.

Plans and Pricing

Tier 1 starts at $39 lifetime for 1 domain and 100,000 monthly page views. Higher tiers add more domains and more page view capacity for teams managing multiple websites.

The AppSumo 60-day refund window gives you more runway than Consently’s standard 14-day trial to test it on your own website before committing.

Check Current Pricing and Tiers

Bottom Line

Privacy compliance is rarely urgent until it is.

For a $39 lifetime starting tier, Consently is a fast, centralized way to get cookie banners, scanning, consent logs, and policy pages in place without turning it into a legal or engineering project.

The one gap, no CSV export for bulk cookie classification, is a real friction point if your website has a lot of unclassified cookies. But at this price point, and with the core functionality it delivers, it is still the right tool for most websites and small teams.

If you want full visibility and control over what’s running on your website without turning compliance into a project, this is one of the easier decisions you’ll make.

Get Consently Lifetime Access

Disclaimer: I am not a lawyer. This content is for educational purposes and reflects my experience and research. Always validate privacy and compliance requirements based on your specific business and jurisdictions.

Looking for more marketing software reviews? See my full list of marketing tools and software I recommend.

Cookie Consent Management and Privacy Compliance Platform Read More »

wordpress mistakes i made

10 WordPress Lessons I Wish I Knew Before Launching My Website

Reading Time: 4 minutes

WordPress makes it easy to launch a website. What it does not make easy is knowing which decisions matter long term.

I have built hundreds of web pages, tested countless plugins, migrated hosts, broken things, fixed things, and learned many of these lessons the hard way.

This post is a collection of WordPress mistakes I personally made so you do not have to repeat them.

If you are just getting started or even if you are a few hundred posts in, there is likely something here that will save you time, money, or frustration.

1. Pages versus posts

Out of the gate, I was confused about what should be a post versus a web page. I treated them interchangeably, which eventually forced me to use a plugin just to convert content into what it should have been from the beginning.

One thing I did not realize early on is that posts often have a narrower content width than web pages, depending on your theme. That difference matters if you are creating long-form content, comparison tables, calculators, or layouts that need more horizontal space.

Before publishing anything, decide whether the content is time-based and part of a blog, or evergreen and better suited as a web page.

2. There is a plugin for that, but that does not mean you need it

WordPress has a plugin for almost everything, which is both a strength and a trap.

I installed plugins without fully understanding overlap, performance impact, or long-term maintenance. Over time, this led to bloated functionality and slower performance.

Instead of installing plugins impulsively, think in categories and needs. I broke this down more intentionally in a separate post on essential plugin categories for serious websites.

The 10 WordPress Plugin Categories Every Serious Website Needs

3. Theme limitations sneak up on you

It is easy to get dependent on a theme and assume certain features will always be available. Sometimes they are not.

I learned that some themes lock basic functionality behind paid upgrades, even features you might assume are standard. That can leave you paying for things simply because switching later feels painful.

My advice is to push a free theme as far as you can. When you eventually upgrade or purchase a premium theme, you will know exactly what features you truly need.

4. Your host needs to support email

My first hosting platform did not support email at all. That decision quietly blocked growth opportunities.

Launching a newsletter, sending transactional messages, or even managing basic website-related communication became unrealistic until I moved my website to a different host.

Email support may not feel important on day one, but it becomes critical much sooner than most people expect.

5. Host support quality matters more than pricing

There are plenty of lifetime hosting deals available, and there is nothing inherently wrong with choosing one.

The tradeoff is support. If you choose a low-cost or lifetime host, do not expect hands-on help or fast response times when things break.

Support quality and response time directly impact how quickly you can fix issues, restore backups, or troubleshoot problems that affect your website.

6. Backup storage adds up fast

Backup plugins can create massive files, especially when images, videos, and multiple versions of content are involved.

I underestimated how quickly backups would eat into hosting storage limits. This becomes a real issue if backups run automatically and are stored on the same server.

Before choosing a backup solution, understand file size, retention rules, automation options, and where those backups are stored.

7. Images and videos deserve a system

Early on, I had no consistent approach to image naming, formats, storage location, or optimization. That mistake compounds over time.

Decisions like PNG versus JPG, image dimensions, compression, version control, and where media is stored all affect performance and backup size.

The biggest miss for me was not understanding featured images. I did not fully grasp their importance until I was more than 250 web pages into my website.

Featured images matter for internal search, external search previews, social sharing, category listings, and user scanning behavior. Every post and blog web page should have one.

8. It is okay not to have a perfect strategy

I spent too much time worrying about a master plan instead of taking the next step.

WordPress allows you to test, refine, and evolve. Publish content, look at your data, and adjust based on what you learn.

Momentum matters more than perfection.

You also have to remember that you see your website far more than anyone else ever will. Just because you are starting to feel bored with how it looks or think it needs a refresh does not mean your visitors feel the same way. Most people are not evaluating design choices or novelty. They just want value. It is your website, so only you care that your baby is pretty. Everyone else cares that it helps them.

9. Hello World does not matter

No one cares about your first post. That is not an insult, it is freedom.

Consistency, patience, and promotion matter far more than any single article. Content does not magically get discovered just because it exists.

Commit to publishing and promoting for at least a year. Fall in love with the process, not the immediate results.

10. Internal linking is not optional

Internal linking is one of the most overlooked parts of WordPress websites.

New content should intentionally link to existing content, and existing content should be updated to link forward where relevant.

Related posts within the same category help readers continue their journey and help search engines understand how your content connects.

Your internal linking structure should not look like a collection of islands. It should clearly communicate relationships and topical depth.

Launch your website with internal linking in mind and treat it as an ongoing process, not a one-time task.

10 WordPress Lessons I Wish I Knew Before Launching My Website Read More »

launching a wordpress website

Launching a WordPress Website: A Practical, Real-World Checklist

Reading Time: 6 minutes

Launching a website sounds simple until you are actually responsible for doing it. Most guides either oversimplify the process or dive too deep, covering too many edge cases and creating cognitive overwhelm.

This article walks through how to launch a website using WordPress as a concrete example. WordPress powers roughly 43% of all websites on the internet, which makes it not just popular, but a practical default for marketers who want flexibility without locking themselves into proprietary platforms.

The goal here is not to turn you into a developer or walk through every possible scenario. It is to give you enough real-world context to make good decisions, avoid common mistakes, and understand what actually matters during a launch.

This guidance is based on hands-on experience migrating a production website between hosting environments and fixing issues that are frequently missed or misunderstood, even by experienced marketing teams.

1. Buy a domain from a registrar

Your domain is your permanent address on the internet. You purchase it from a domain registrar such as GoDaddy, Namecheap, or Google Domains.

Best practices:

1. Register the domain yourself, not through a third party who will later control it.

2. Enable auto renewal so you do not accidentally lose it.

3. Use a registrar account tied to an email address you expect to keep long term.

It does not matter much which registrar you choose. What matters is ownership, renewal management, and account security.

2. Purchase a hosting service

Your hosting service is where your website files live and where WordPress runs. Think of this as the land your house sits on, while the domain is the address.

At a minimum, your hosting service should support:

1. WordPress.

2. SSL certificates.

3. PHP and database management.

4. DNS record management.

5. Backups.

Cheap or lifetime hosting plans often trade cost for constraints that are not obvious at purchase time. These plans typically come with limited human support, slower response times, and fewer options when something breaks.

In many cases, your website is also placed on shared infrastructure alongside hundreds or thousands of other websites. When another website on that same server experiences traffic spikes, security issues, or performance problems, it can affect your website even if you did nothing wrong.

This does not mean shared hosting is always bad, but it does mean stability, support quality, and the ability to get help from a real person matter far more over time than headline pricing.

One often overlooked consideration is whether your hosting service supports email accounts for your domain.

Many marketers assume addresses like info@yourdomain.com are automatically included with hosting. In reality, some hosting plans either do not include email at all or require add-on services and additional setup to enable it.

Email also relies on DNS configuration. If email is hosted separately from your website, it may require additional DNS records beyond those needed for the website itself. Understanding where email is hosted and what DNS changes are required before launch helps avoid broken contact forms, missed messages, or last-minute confusion.

3. Point your domain to your hosting service using DNS

DNS stands for Domain Name System. In plain terms, DNS is like the internet’s contact list that tells browsers where to find your website.

When someone types your domain into a browser, DNS is the system that translates that human friendly name into the technical destination where your website actually lives.

To connect your domain to your hosting service, you update nameservers at your domain registrar to the ones provided by your hosting service.

Once updated, DNS changes can take anywhere from a few minutes to 24 hours to fully propagate.

DNS issues are one of the most common reasons launches get delayed. Do not assume something is broken just because it has not updated immediately.

4. Add required DNS records

Depending on your setup, your hosting service may require additional DNS records such as CNAME records for verification, email, or services like SSL.

CNAME stands for Canonical Name. In plain terms, a CNAME record lets one web address act as an alias for another address. It is a way of saying, “when you see this name, go look over there.”

These records are usually added in your hosting dashboard or at your registrar, depending on where DNS is managed.

Know where your DNS is actually managed. Many people assume it is the registrar when it is not.

5. Install WordPress

WordPress is the content management system that allows you to create, publish, and manage your website without writing code.

Most hosting services offer a one click WordPress install. Once installed, you will receive:

1. A WordPress admin login.

2. A temporary or live URL.

3. Database credentials managed behind the scenes.

Security and performance issues are rarely caused by WordPress itself. They are more often the result of outdated themes, poorly maintained plugins, or weak hosting environments.

6. Choose and install a WordPress theme

Your theme controls the design and layout of your website. Choose a theme that is:

1. Actively maintained.

2. Lightweight.

3. Compatible with modern WordPress features.

4. Flexible enough without being bloated.

Many themes offer both free and paid versions. Before committing, understand what functionality is included for free and what limitations exist without a paid upgrade. In some cases, critical layout or customization options are locked behind the paid version.

Avoid themes that promise everything out of the box. Those often introduce unnecessary complexity, performance issues, and long-term maintenance risk.

The theme you pick today does not need to be your forever theme. Replacing a theme is typically no more difficult than installing or removing a plugin, especially if your content and structure are built cleanly. Prioritize clarity and performance over visual complexity.

7. Build your core website structure

Before worrying about polish, build the essentials:

1. Home web page.

2. Blog web page.

3. About web page.

4. Contact web page.

Focus on clear navigation, readable layouts, and content that explains who the website is for and why it exists.

Most websites launch too much content instead of the right content. Less is usually better at launch.

8. Set up email (if needed)

If your hosting service provides email, you can create addresses like info@yourdomain.com. Alternatively, email can be handled by a separate provider.

The important thing is that email DNS records are configured correctly so messages are delivered reliably.

Email hosting and website hosting do not have to be bundled. In many cases, separating them improves reliability.

9. Review hosting performance and optimization settings

Many hosting services include performance and optimization settings. These may be grouped into low risk, medium risk, and high risk categories.

Review these carefully and enable improvements gradually so you can identify any issues they introduce.

Performance tools are helpful, but they can break functionality if applied blindly. Always test after changes.

10. Install essential plugins

One of the first plugins most websites need is a form plugin so visitors can contact you. From there, plugins should be added intentionally, not impulsively.

Rather than listing individual plugins here, refer to this guide on the 10 plugin categories every website needs.

The best plugin list is not the longest list. It is the smallest list that clearly covers real needs with minimal overlap.

11. Configure SEO basics most people miss

One commonly overlooked task is adding meta descriptions for category and tag web pages.

Using an SEO plugin like Yoast, you can add a dynamic meta description template for these archives so they are not left blank.

Example dynamic meta description:

Explore %%term_title%% content on %%sitename%%. Practical tips, tools, and insights to help you grow your marketing skills.

This will not magically drive traffic, but it prevents avoidable SEO quality issues that accumulate over time.

12. Set your home page and blog web page

By default, WordPress shows blog posts on the home page. Most websites want a custom homepage instead.

Go to Settings, then Reading:

1. Select the Static page option.

2. Assign your Home web page as the home page.

3. Assign your Blog web page as the posts web page.

This setting is easy to miss and causes confusion when content appears in unexpected places.

13. Create a privacy policy web page

A privacy policy is required if you collect any user data, including contact form submissions or analytics data.

WordPress includes a built-in privacy policy generator you can customize based on the tools and data collection methods used on your website.

Analytics platforms like Google Analytics 4 include privacy-focused features such as configurable data retention, consent support, and region-aware controls. These help support compliance efforts, but they do not replace the need for a clear, accessible privacy policy.

It is also important to understand that privacy requirements are based on who visits your website, not who you intend to sell to. Even if you do not actively target certain countries or regions, visitors from those locations may still access your website, which can trigger applicable privacy obligations.

This is not just a legal checkbox. It is part of building trust with users and being transparent about how data is collected and used.

14. Set up analytics and search visibility

Before launch, ensure you have basic visibility into how people find and use your website. At a minimum, this includes analytics to understand traffic and a way to confirm your website can be discovered by search engines.

This is not about advanced reporting. It is about confirming your website is measurable, indexable, and not operating as a black box from day one.

Final thoughts

Launching a website is not a single event. It is the starting point of an ongoing system you will maintain, measure, and refine.

If your website loads reliably, communicates clearly, and avoids preventable mistakes, you are already ahead of most launches.

You can always iterate. Fixing a messy foundation later is much harder.

Launching a WordPress Website: A Practical, Real-World Checklist Read More »