SiteSqueeze

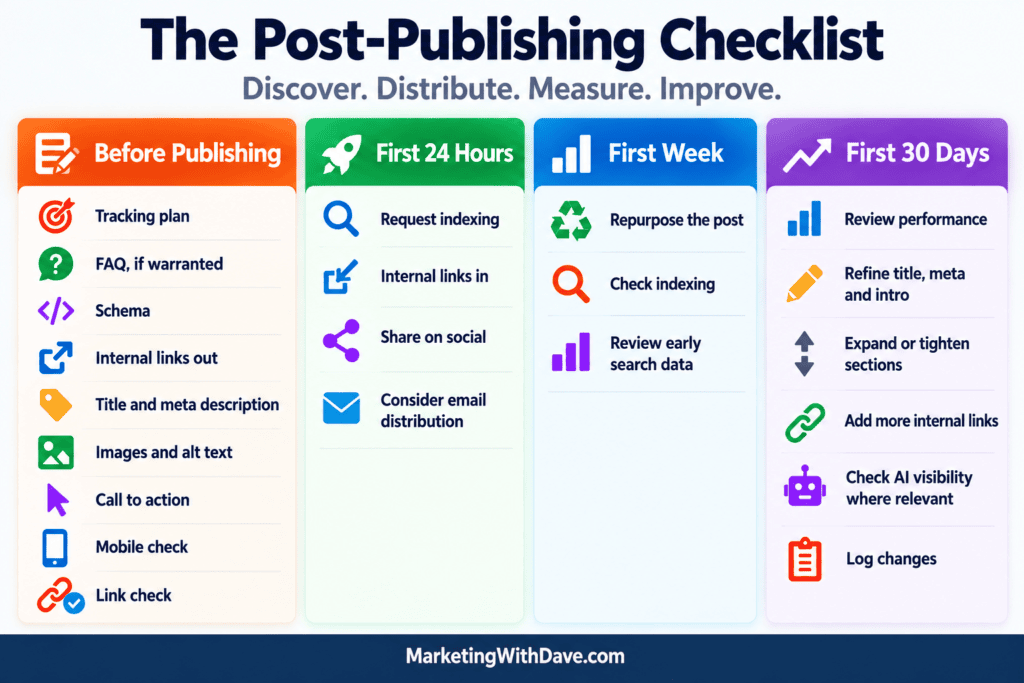
Post-Publishing Checklist infographic showing steps before publishing, first 24 hours, first week, and first 30 days for effective content management and SEO.

You Published a New Blog Post. Now What?

Reading Time: 3 minutes

Publishing is a technical event, not the moment a piece of content is finished. It’s easy to hit publish, share the link once, and start the next article. The post then sits in the archive waiting for Google to notice it.

Distribution is where the work starts. Here is a repeatable checklist, organized by when to do each step.
Before You Hit Publish: Is the Page Actually Done?

Most of what gets forgotten happens here, and it is far cheaper to fix now than after indexing.

  • Tracking plan: Know what the page is supposed to accomplish and how you will measure it. Is the goal search traffic, conversions, supporting another page, or something else? If you cannot say what success looks like, you cannot evaluate it later.
  • FAQ section: Add one only when readers would naturally ask follow-up questions. Keep answers short and specific. Not every post needs one, and padding an FAQ with filler questions hurts more than it helps.
  • Schema: Check whether there is appropriate structured data for the content, such as Article, FAQ, HowTo, Review, or Product schema. Use schema only when it genuinely matches what is visible on the page.
  • Internal links out: Link to your own supporting content where it helps the reader.
  • Title and meta description: Would you click this result? Front-load the topic and make the benefit obvious.
  • Images and alt text: Use a visual that explains something, not just a featured image. Write alt text that describes what the image shows.
  • Call to action: After reading, what is the obvious next step? If there is none, the visit ends here.
  • Mobile check: Tables, callouts, and graphics that look great on desktop often break on a phone. Check before you promote.
  • Link check: Click every internal and external link.

First 24 Hours: Get It Discovered

  • Request indexing in Search Console and confirm the page is in your sitemap.
  • Internal links in. Find older, relevant articles that should point readers to the new one and add links with descriptive anchor text. This is easy to overlook because internal linking usually happens while writing the new article, but links to that article have to be added elsewhere on the site. Older posts may already be attracting search traffic and readers, making them a natural path to your new content.
  • Share it natively on the channels you actually use, with copy written for each platform instead of one pasted link.
  • Consider email distribution. If the article is relevant enough to your email audience, include it in your next newsletter or send it as a standalone message when the topic warrants it.

First Week: Extend the Reach

  • Repurpose the post into several pieces: one post per key point, a stat or checklist graphic, a short video or carousel. Each piece should point back to the article.
  • Check indexing. If the page is not indexed after several days, look for a noindex tag, canonical problems, thin content, or weak internal links.
  • Review early search data. Look at impressions, clicks, queries, and average position in Search Console. If the page is earning impressions but few clicks, review how its title and search snippet appear. If impressions are limited, look at the queries it is appearing for, its position, internal linking, and whether Google is interpreting the page the way you expected.

First 30 Days: Measure and Improve

  • Review performance: Look at impressions, clicks, average position, engagement, and CTA clicks where relevant. Compare the results with what you expected the article to accomplish.
  • Refine the title, meta description, and intro based on what the queries show.
  • Expand or tighten sections based on the questions people actually search.
  • Add more internal links from any new posts published since.
  • Keep a log of what you changed and when. Otherwise you will never know what worked.
  • Check AI visibility where it matters. For articles targeting questions people are likely to ask AI tools, check whether your content or brand appears in relevant responses. Treat individual results as directional rather than definitive, since results vary by platform and over time.

The Piece Most Sites Skip: Using Existing Traffic

Every step above depends on outside sources: search engines, social platforms, email. Meanwhile, the audience you already have is reading your older articles right now.

Those readers are already interested in your topics. If nothing on those pages points them to your newest content, you are relying on them to discover it by chance. Static sidebar links and buried “related posts” widgets are easy to ignore, and blindly plastering banners everywhere leads to banner blindness.

That’s one reason I built the Latest Category Article feature in SiteSqueeze. Instead of publishing a new article and hoping visitors to older content eventually find it, I can use traffic already arriving on my site to automatically promote the newest article from a relevant category. SiteSqueeze also lets me create standard promotions and measure how those promotions perform, giving existing website traffic another job beyond viewing the page it originally landed on.

Publishing puts a URL on the internet. Distribution gives the article a chance to do its job.

The goal isn’t to promote every post forever. Give it a deliberate launch, put it in front of the audiences you already have, watch what happens, and make changes when the data gives you a reason.

You Published a New Blog Post. Now What? Read More »
Screenshot of 'Your SiteSqueeze license is now active' message in the Settings section of a website dashboard.

How to Install SiteSqueeze on WordPress

Reading Time: 4 minutes

SiteSqueeze installs like a standard WordPress plugin. You will need the SiteSqueeze ZIP file and the license key included in your order email.

The same installation process applies to SiteSqueeze Free and SiteSqueeze Pro.

Before you begin

Make sure you have:

  • Administrator access to your WordPress website
  • The SiteSqueeze plugin ZIP file
  • Your SiteSqueeze license key

Your download link and license key are included in the email titled Your SiteSqueeze Free license is ready or in the corresponding SiteSqueeze Pro order email.

If someone else manages your WordPress website, you can forward that email to your website developer or WordPress administrator.

1. Download SiteSqueeze

Open your SiteSqueeze email and select the installation or download link.

Download the SiteSqueeze ZIP file to your computer. Do not unzip the file. WordPress needs the original ZIP file to install the plugin.

If your browser automatically extracts downloaded ZIP files, locate the original ZIP file in your Downloads folder before continuing.

2. Upload SiteSqueeze to WordPress

  1. Sign in to your WordPress administration area.
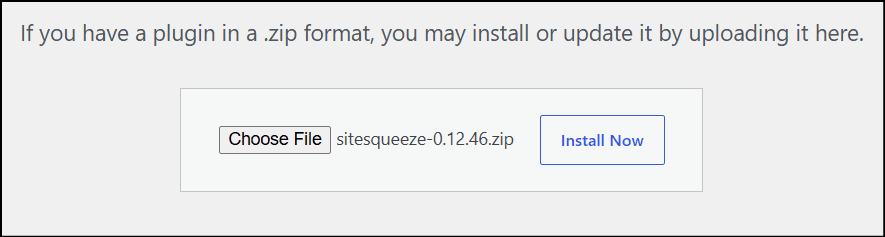
  2. From the WordPress menu, go to Plugins → Add New Plugin.
  3. Select Upload Plugin near the top of the page.
  4. Select Choose File.
  5. Choose the SiteSqueeze ZIP file you downloaded.
  6. Select Install Now.

WordPress will upload and install SiteSqueeze. This may take several seconds.

Screenshot of a website upload interface with a ZIP file named 'sitesqueeze-0.12.46.zip' and an 'Install Now' button for plugin installation.

3. Activate the plugin

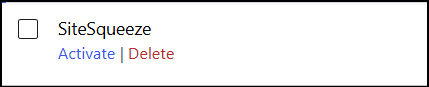
When WordPress confirms that the plugin was installed successfully, select Activate Plugin.

Screenshot of SiteSqueeze plugin interface showing options to activate or delete the plugin for WordPress website.

After activation, SiteSqueeze will be added to your WordPress administration menu.

Marketing with Dave logo featuring bold white text on a black background, emphasizing digital marketing expertise and branding for online marketing services.

4. Activate your SiteSqueeze license

Installing the ZIP file adds SiteSqueeze to WordPress, but a valid license is required to use the plugin.

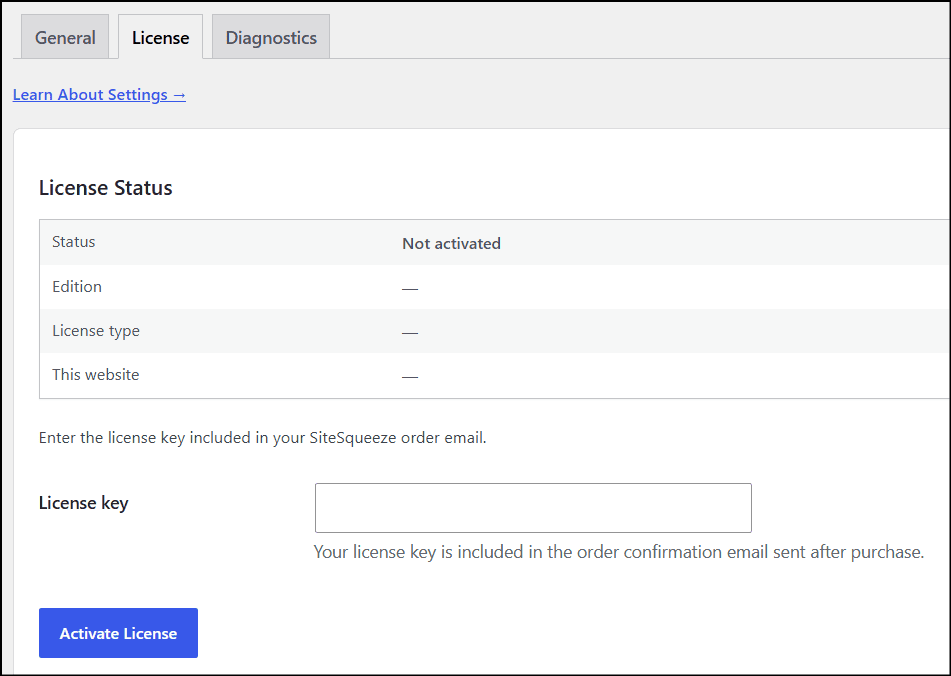
  1. Open SiteSqueeze from the WordPress administration menu.
  2. Go to Settings → License.
  3. Copy the license key from your SiteSqueeze email.
  4. Paste the key into the license field.
  5. Select the button to activate or save the license.

Copy the complete license key, including all letters, numbers, and hyphens. Avoid adding spaces before or after it.

Screenshot of the WordPress license activation page for 'Marketing with Dave' website, showing license status, edition, and license key input field.

5. Confirm that SiteSqueeze is ready

After the license is accepted, confirm that the License screen shows an active license.

The screen should also identify your SiteSqueeze edition:

  • SiteSqueeze Free: One website, one active Standard Promotion, and one active Placement
  • SiteSqueeze Pro: The paid SiteSqueeze features and limits associated with your license

You can now begin configuring SiteSqueeze and creating your first promotion.

Installing an updated version

If SiteSqueeze is already installed and you are manually uploading a newer version, WordPress may tell you that the destination folder already exists.

When WordPress displays the current and uploaded versions, confirm that the uploaded version is newer. Then select Replace current with uploaded.

Your existing SiteSqueeze settings, promotions, placements, performance data, and license information should remain in place during a normal update.

As a precaution, maintain a current backup of your website before manually replacing any WordPress plugin.

Troubleshooting

WordPress will not accept the uploaded file

Confirm that you are uploading the original SiteSqueeze ZIP file. Do not upload an extracted folder or one of the files inside it.

The plugin installed, but SiteSqueeze is not available

Go to Plugins → Installed Plugins and confirm that SiteSqueeze is activated.

The license key is not accepted

  • Copy the entire key from your SiteSqueeze email.
  • Check for spaces before or after the key.
  • Confirm that the license is not already active on another website.
  • Try copying and pasting the key again rather than entering it manually.

You did not receive the license email

Check your spam, promotions, and junk folders for an email from MWD Software.

If you registered for SiteSqueeze Free again using the same email address, SiteSqueeze should resend the existing license rather than create another license.

The installation is taking a long time

Uploading and activating SiteSqueeze normally takes only a short time. If WordPress remains on the same screen for several minutes, refresh the page and check Plugins → Installed Plugins before trying the upload again.

Need help?

If you need help installing or activating SiteSqueeze, reply to your license email or contact us.

Include the email address used to register or purchase SiteSqueeze. You do not need to send your full license key unless support specifically requests it.

How to Install SiteSqueeze on WordPress Read More »

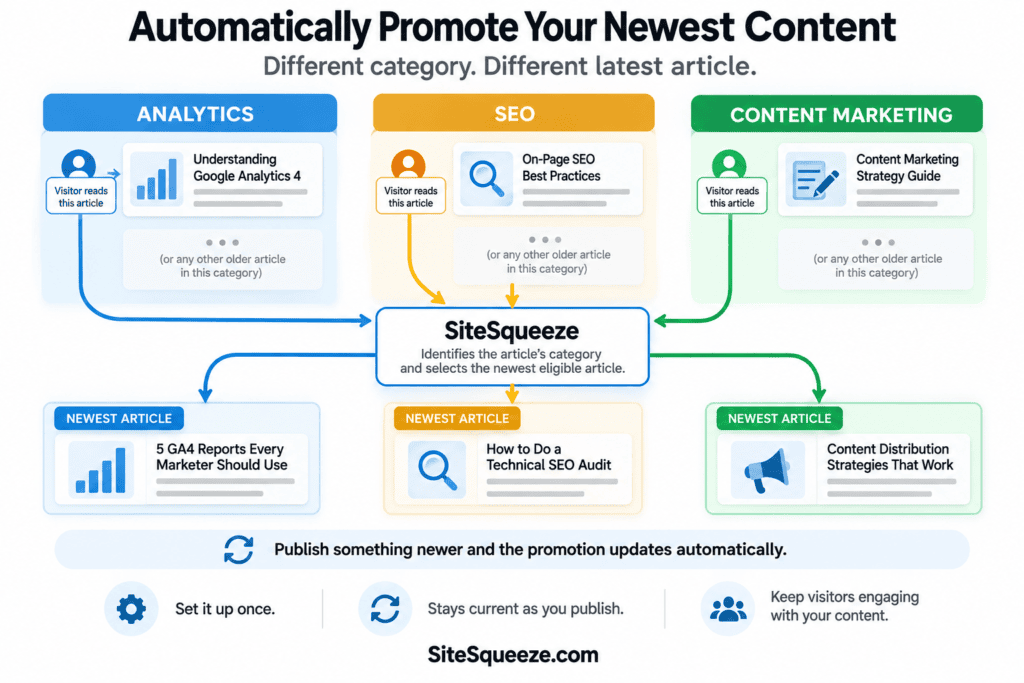
Diagram illustrating automatic content promotion with categories like Analytics, SEO, and Content Marketing, highlighting SiteSqueeze's role in identifying and selecting articles for promotion.

How to Create a Latest Category Article Promotion in SiteSqueeze

Reading Time: 3 minutes

Publishing a new article doesn’t mean your existing visitors will find it.

Hitting Publish is really the beginning of the work. Your new article may get indexed by search engines, shared on social media, or included in an email, but you still need ways to put it in front of people who are already visiting your site.

That’s where Latest Category Article promotions in SiteSqueeze come in.

Instead of manually adding links to older posts every time you publish something new, you create the promotion once. SiteSqueeze uses your existing content to automatically surface the newest eligible article in the same category.

As you publish again, the article being promoted can change automatically.

Diagram illustrating automatic content promotion with categories like Analytics, SEO, and Content Marketing, highlighting SiteSqueeze's role in identifying and selecting articles for promotion.

Set It Up

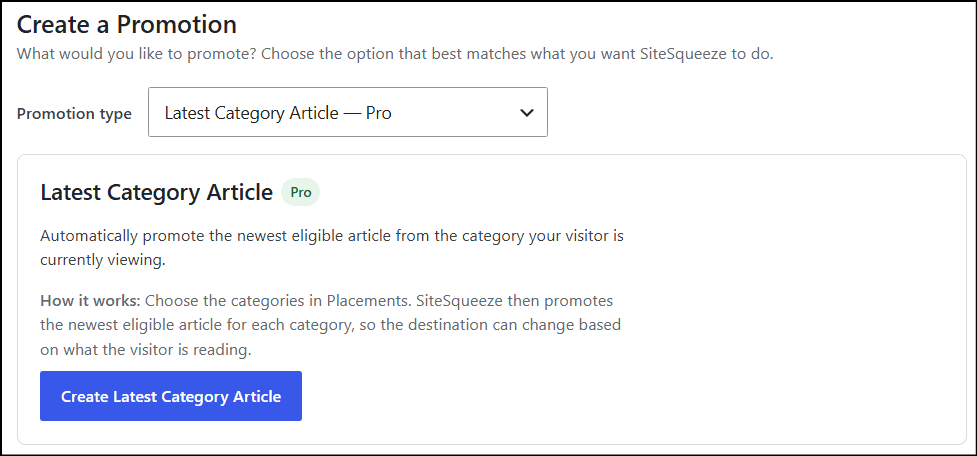
From your WordPress dashboard, go to SiteSqueeze → Promotions and select Create → Latest Category Article.

Screenshot of a website interface showing options to create and promote a latest category article for SEO and marketing strategies.

Setup is minimal: name the promotion so you can find it later, toggle it on or off, and set the button text (defaults to “Read More”). Unlike a Standard Promotion, there’s no destination URL, headline, or image to configure. SiteSqueeze handles those dynamically.

How SiteSqueeze Picks the Article

This is the core difference from a Standard Promotion. You don’t choose the destination. SiteSqueeze finds the newest eligible published article in the applicable category the visitor is reading, then pulls its title, featured image, and URL.

Two rules govern eligibility:

  • No self-promotion. The article a visitor is currently reading is excluded.
  • Featured image required. If no other eligible article in the category has one, the promotion won’t display.

Say your newest Analytics article today is Understanding Attribution Models. That’s what gets promoted to readers of older Analytics posts. Publish 5 GA4 Reports Every Marketer Should Use next week, and it can take over as the promoted article automatically. No edits, no new URL, no swapped image.

Placements Control Where It Appears

Enabling the promotion isn’t enough on its own. It also needs a Placement.

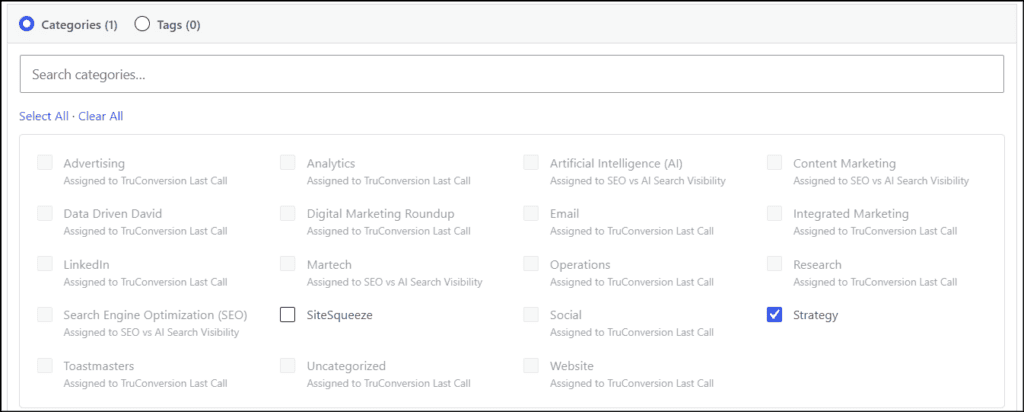
The distinction: Placement decides where a promotion can appear; SiteSqueeze decides what gets promoted. A Placement tied to your Analytics category opens the door for the Latest Category Article promotion to run on eligible Analytics content, and SiteSqueeze fills in the newest eligible article.

Placements can use categories or tags to set eligibility, but article selection always follows category. If you’re using the All Others Placement, SiteSqueeze pulls from the first eligible category alphabetically.

One constraint: a Latest Category Article promotion must be the only promotion assigned to its Placement.

Learn more about creating and managing Placements in SiteSqueeze

Marketing with Dave logo displayed on a website header, featuring a modern design with bold text and vibrant colors, emphasizing digital marketing expertise and online branding.

Optional Controls

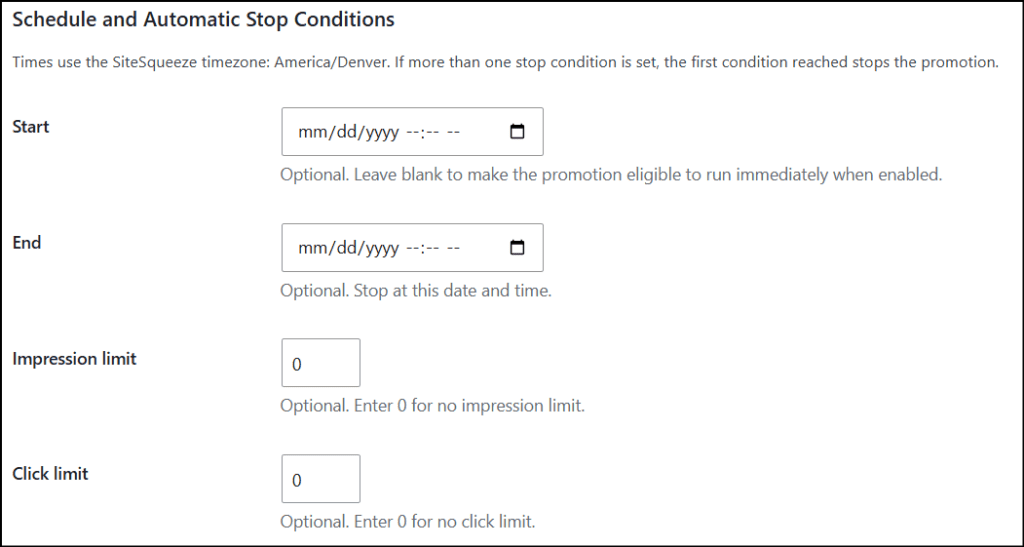
You can limit how long a promotion runs:

  • Start/End Date — schedule when it’s eligible to display
  • Impression Limit — stop it after a set number of views
  • Click Limit — stop it after a set number of clicks

None of these are required. If you want Latest Category Article running indefinitely as a standing way to circulate newer content, leave them off. If you set more than one limit, the promotion stops at whichever condition hits first.

Screenshot of scheduling and automatic stop conditions settings from Marketing with Dave website, showing options for start and end dates, impression and click limits.

Track What Actually Gets Promoted

Because the destination changes, a promotion showing 100 impressions doesn’t tell you the whole story; those impressions could be spread across several different articles. SiteSqueeze’s Latest Category Article Performance report breaks down which categories generated opportunities, which articles got promoted, and how visitors responded. I cover that in detail in SiteSqueeze Latest Category Article: Understand What Content Gets Promoted.

The Bottom Line

Every article you publish is another entry point to your website. Latest Category Article promotions make sure older entry points keep leading somewhere current, without you having to maintain the link. Set it up once, connect it to the right Placement, and it stays current as your content library grows.

SiteSqueeze is coming soon.

I’m building a WordPress plugin designed to help marketers promote their own content, measure what works, and run practical A/B tests without pretending every website has enterprise-level traffic.

Join the list to know when SiteSqueeze launches.

How to Create a Latest Category Article Promotion in SiteSqueeze Read More »

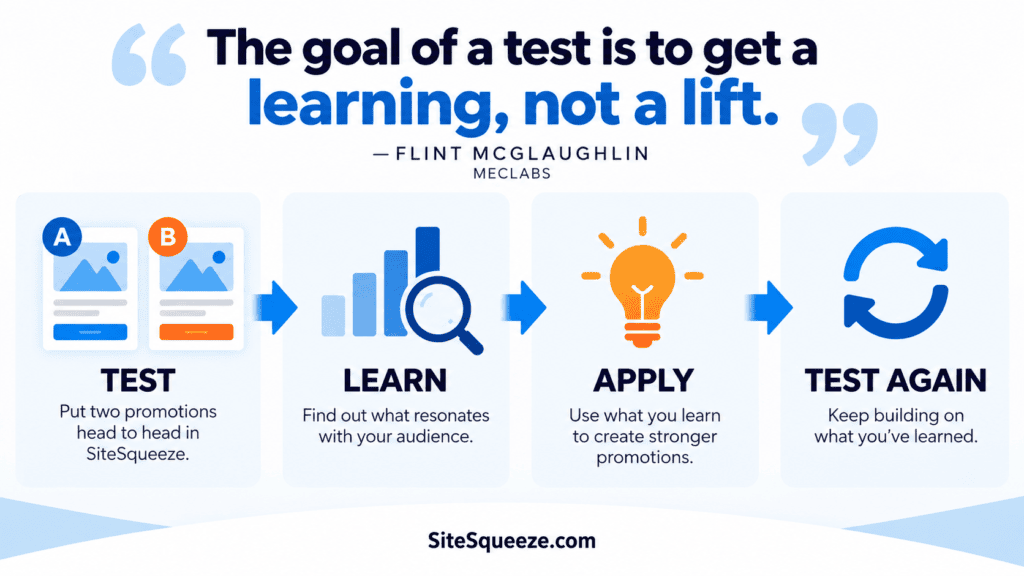
Infographic illustrating the learning process with steps: test, learn, apply, and test again, emphasizing education and training concepts for marketing and professional growth.

How to Create an A/B Test in SiteSqueeze

Reading Time: 3 minutes

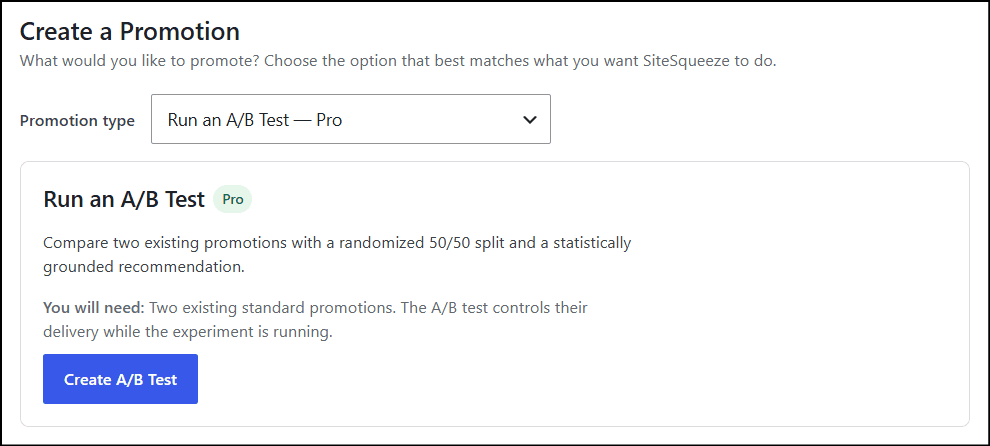
A/B testing in SiteSqueeze puts two promotions head to head so you can see which one actually earns more clicks. Pick two Standard Promotions, set a threshold for what counts as a real improvement, assign a Placement, and start the test. SiteSqueeze splits your traffic roughly 50/50 and tracks the results.

Before You Start

You need two existing Standard Promotions before you can run a test. Haven’t made them yet? Start with How to Create a Standard Promotion in SiteSqueeze.

A typical setup:

  • Control A: your current promotion, headline and image as-is
  • Variation B: an alternative version with something you want to test

If you want to understand why one version performs better, change one major variable at a time. Changing the headline, image, and call to action together can tell you which overall promotion performs better, but not which change made the difference. If your goal is simply to compare two different creative approaches, changing multiple elements can make sense.

Set Up the Test

A/B testing is a SiteSqueeze Pro feature.

From Promotions, select Run an A/B Test, then Create A/B Test.

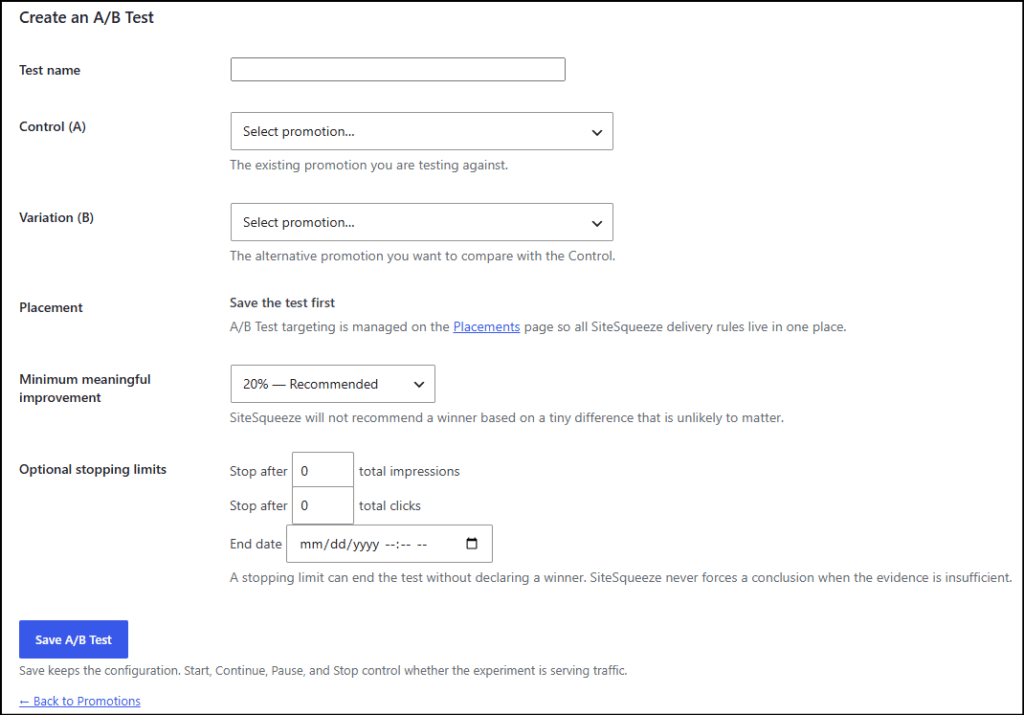
Name the test something you’ll recognize later. “SiteSqueeze Headline Test – September” beats “Test 1” every time.

Then choose:

  • Control (A): the promotion you’re testing against
  • Variation (B): the challenger

These have to be two different promotions.

Screenshot of an A/B testing setup page on Marketing with Dave website, showing options for test name, control and variation promotions, placement, and stopping limits.

Set Your Minimum Meaningful Improvement

This threshold decides how much better one promotion needs to perform before SiteSqueeze considers the difference meaningful:

ThresholdMeaning
10%Small improvement
20%Recommended (default)
30%Strong improvement
50%Major improvement

A 2% lift might be real, but if it’s not big enough to change what you do next, it’s not worth treating as a winner. Set this threshold before the test starts, not after you’ve seen which version is ahead.

Want the full mechanics, including the seven-day minimum test window and how SiteSqueeze weighs the evidence? See SiteSqueeze A/B Testing: How Winner Recommendations Work.

Set a Stopping Limit (Optional)

Choose how the test ends, if you want a hard stop:

  • Total impressions
  • Total clicks
  • End date

Leave these blank for no limit.

A stopping limit ends collection. It doesn’t force a winner. If a test hits 5,000 impressions without strong enough evidence, SiteSqueeze marks it Inconclusive rather than declare a winner it can’t back up. That’s by design.

Save, Then Assign a Placement

Click Save A/B Test. The test now exists, but it isn’t live yet.

SiteSqueeze routes A/B tests through Placements, the same system that controls every other promotion type, so all your targeting rules live in one place.

Go to Placements, create or edit the one you want, and select your A/B test. Target it by category, tag, or All Other Content.

One rule: while the test runs, Control A and Variation B can’t have their own separate Placements. The test needs full control of delivery.

See SiteSqueeze Placements: Control Where Your Promotions Appear for a full walkthrough.

Start the Test

Back in your A/B test, click Start Test.

SiteSqueeze now handles delivery: visitors are split roughly 50/50 between Control A and Variation B, and returning visitors see the same variation each time browser storage allows it.

You can Pause Test anytime and resume later without losing collected data. Stopping the test entirely preserves whatever statistics it already gathered.

What to Expect

Let it run. SiteSqueeze needs at least seven full active days of data before it will recommend a winner, and even then, seven days alone isn’t a guarantee the evidence is strong enough.

You’ll see Keep Testing, a recommendation for Control A or Variation B, No Meaningful Difference, or Inconclusive. Full breakdown here: SiteSqueeze A/B Testing: How Winner Recommendations Work.

Test With a Question in Mind

Setting up a test is the easy part. Deciding what’s worth testing is what actually matters.

Skip “which one wins” and ask something you want an answer to:

  • Does a benefit-focused headline beat a feature-focused one?
  • Does a product shot outperform a conceptual image?
  • Does “Download the Guide” out-click “Learn More”?

Flint McGlaughlin of MECLABS has a line I’ve always liked: “The goal of a test is to get a learning, not a lift.”

That’s the mindset to bring to SiteSqueeze. A winning variation is useful. Learning why it won gives you something you can carry into the next promotion, the next test, and the marketing decisions that follow.


SiteSqueeze is coming soon.

I’m building a WordPress plugin designed to help marketers promote their own content, measure what works, and run practical A/B tests without pretending every website has enterprise-level traffic.

Join the list to know when SiteSqueeze launches.

How to Create an A/B Test in SiteSqueeze Read More »

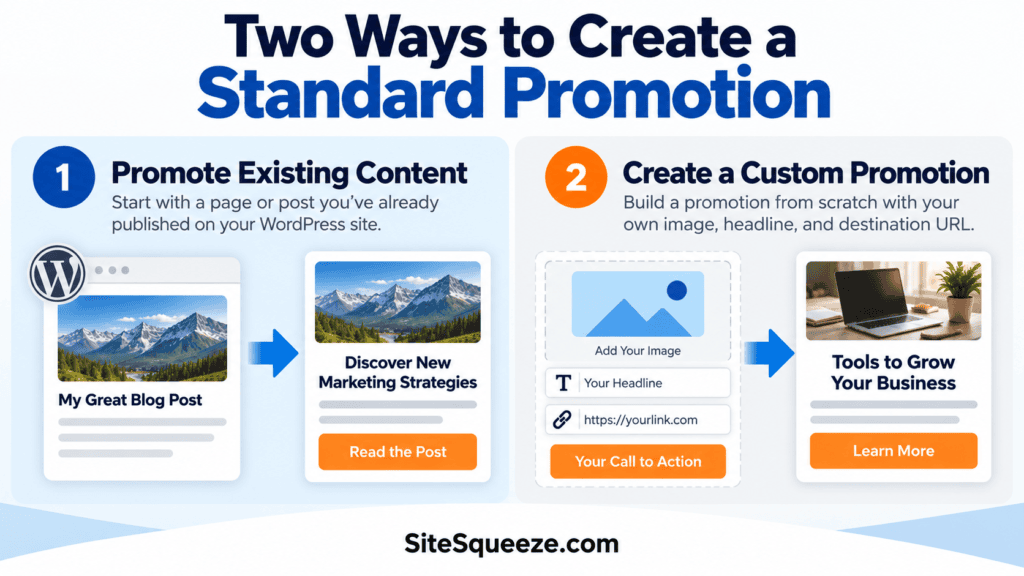
Infographic showing two methods to create a standard promotion: promote existing content or build a custom promotion with tools and strategies for marketing success.

How to Create a Standard Promotion in SiteSqueeze

Reading Time: 3 minutes

Standard Promotions put your content, offers, and affiliate links in front of visitors across your WordPress site, without you touching a page builder or writing a line of code.

You’ve got two ways to build one:

  • Promote Existing Content — turn a page or post you’ve already published into a promotion.
  • Create a Custom Promotion — build one from scratch with your own image and destination URL.

Same result either way: a Standard Promotion. The only difference is how much of the setup SiteSqueeze handles for you.

Infographic showing two methods to create a standard promotion: promote existing content or build a custom promotion with tools and strategies for marketing success.

Promote Existing Content

If what you want to promote already lives on your site, this is the fast path.

Go to Promotion type, select Promote Existing Content, then click Promote Existing Content again to open the chooser.

IMAGE: Promote Existing Content chooser

Search by page title, URL, or slug. The moment you pick your content, SiteSqueeze pulls in:

  • Page or post title
  • Featured image
  • Destination URL

None of that is locked in. A great article headline is often a terrible promotion headline, so shorten it. Swap the image. Rewrite the button text. Even swap the destination URL entirely, if you’d rather send clicks to a tracked link (a Linko URL, for example) instead of the raw page permalink.

Customize It

Name your promotion first. This is an internal label so you can find it later in SiteSqueeze. Visitors never see it.

From there, you control:

  • Headline
  • Image
  • Image alt text
  • Button text
  • Image display
  • Destination URL
  • Link behavior

A live desktop preview gives you an approximate look at how the headline, image, and button will appear together before you save.

Headline rule of thumb: aim for 60 characters or fewer. The field supports up to 80, but shorter headlines are easier to scan and generally fit promotion layouts better.

Create a Custom Promotion

No existing page to work from? Want full control from the ground up? This is your option.

It’s built for offers, affiliate links, announcements, and anything pointing off-site, anywhere there’s no WordPress page for SiteSqueeze to pull from.

Go to Promotion type, select Create a Custom Promotion, then click Create Custom Promotion.

IMAGE: Create a Custom Promotion chooser

Name it, then add your image and destination. For images, SiteSqueeze recommends 1080 × 1080 or 1080 × 1350, optimized for web. Add alt text, drop in your destination URL, and decide whether it opens in a new tab.

Here, nothing is pre-filled. You’re building it from zero.

Schedule It

Both creation methods share the same scheduling controls. Set any combination of:

  • Start date/time — leave blank to go live the moment it’s enabled.
  • End date/time — auto-stop at a set time.
  • Impression limit — auto-stop after a set number of views.
  • Click limit — auto-stop after a set number of tracked clicks.

Set more than one? SiteSqueeze stops the promotion the instant any single condition hits. All times run on your site’s configured SiteSqueeze timezone.

Enabled Isn’t the Same as Visible

Flipping a promotion to enabled only makes it eligible to run. It won’t show up anywhere until it has a Placement.

A Placement tells SiteSqueeze where to run the promotion: specific categories, tags, or All Other Content.

The promotion is what visitors see. The Placement is where they see it. Skip the Placement and your promotion goes nowhere.

Haven’t set one up yet? See [Understanding SiteSqueeze Placements] for how targeting works.

Save It

Click Save Promotion.

It now sits alongside your other promotions in SiteSqueeze, ready to edit, enable, disable, or check on anytime.

Once it’s enabled, placed, and within any schedule or limits you’ve set, the promotion becomes eligible to display to visitors.

Track What It’s Doing

Building the promotion is step one. SiteSqueeze Performance shows you impressions, tracked CTA clicks, click-through rate, and everything else you need to know which promotions are actually earning their spot on your site.

See Understanding Standard Promotions Performance for the full breakdown.

How to Create a Standard Promotion in SiteSqueeze Read More »

Marketing with Dave logo displayed on a website, emphasizing digital marketing strategies and SEO optimization for business growth.

SiteSqueeze Standard Promotions: Understand What’s Driving Performance

Reading Time: 3 minutes

The Standard Promotions tab in SiteSqueeze Performance shows how your regular promotions are performing across your WordPress site.

It focuses on the essentials: impressions, clicks, click-through rate, daily performance, and the pages where each promotion appeared.

Standard Promotions reporting covers two types of promotions:

  • Promote Existing Content promotions, created from an existing WordPress post or page.
  • Custom Promotions, created with your own image, message, call to action, and destination URL.
Marketing with Dave logo displayed on a website, emphasizing digital marketing strategies and SEO optimization for business growth.

Other SiteSqueeze promotion types have their own reporting. A/B Tests, Latest Category Article, and Ad Reach each get a separate Performance tab so they can report on what’s specific to how that feature works.

Understanding Standard Promotion performance

Each promotion includes a summary for the date range currently selected in Performance.

The primary metrics are:

  • Impressions: the number of times SiteSqueeze recorded the promotion as displayed.
  • Clicks: the number of displayed clicks, meaning tracked clicks plus any manual adjustment (more on that below).
  • CTR: click-through rate, calculated by dividing clicks by impressions.

You can change the reporting period using the date selector at the top of Performance, with options including Today, Yesterday, This Month, Last Month, Last 30 Days, Custom, and Lifetime. The selected date range applies to the performance figures shown in the report.

Review performance by day

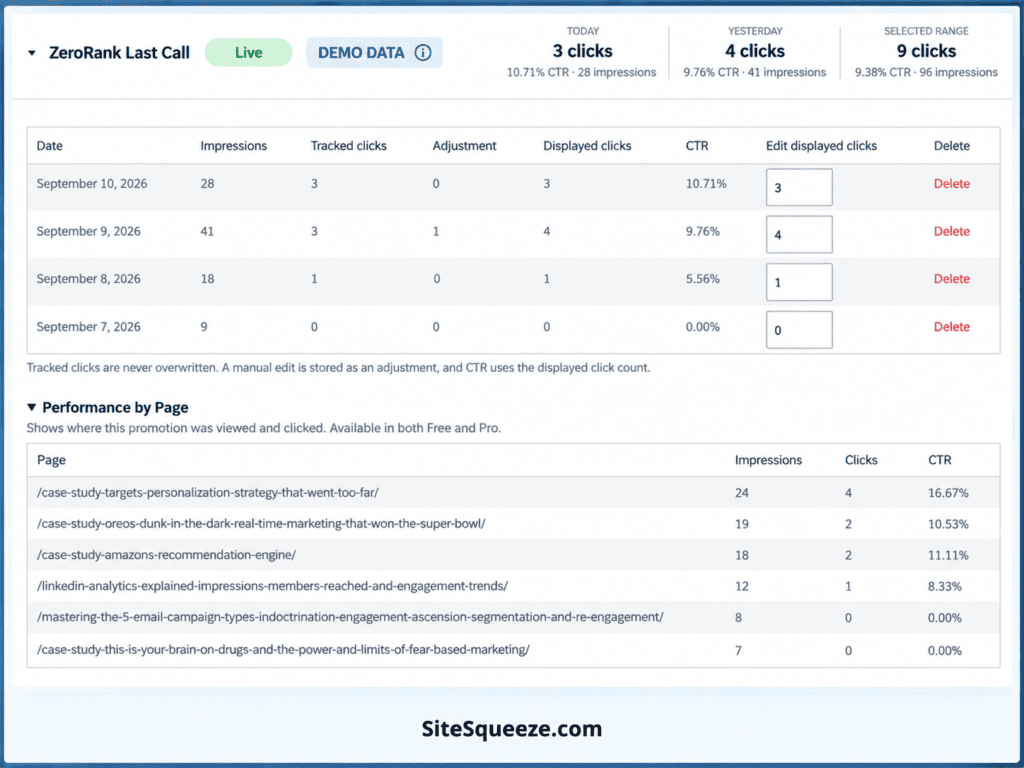
Expand a promotion to see its results broken down by day. Daily reporting separates three figures:

  • Tracked Clicks: clicks recorded directly by SiteSqueeze.
  • Adjustments: any manual correction you’ve added.
  • Displayed Clicks: tracked clicks plus adjustments. This is the same figure used as “Clicks” in the summary above, and it’s what the CTR calculation uses.

If you have a reason to correct a click total, SiteSqueeze preserves the original tracked figure rather than overwriting it and records your correction as a separate adjustment. For example, if SiteSqueeze tracked 10 clicks and you added an adjustment of 2, the report would show 12 Displayed Clicks while still keeping the original 10 tracked clicks visible in the breakdown.

See where a promotion performed

The Performance by Page section shows the WordPress pages where a promotion generated impressions and clicks.

This is useful alongside the overall CTR, not instead of it. It can help answer questions like:

  • Which pages are generating the most exposure for this promotion?
  • Where are visitors actually clicking it?
  • Does the promotion perform differently depending on the surrounding content?

What to look for

Start with impressions, clicks, and CTR.

A promotion getting plenty of impressions but few clicks may be worth revisiting. The image, message, offer, or call to action may be worth testing or revisiting.

A promotion getting very few impressions is a different problem, and not necessarily a sign the promotion itself is underperforming. Placement, eligibility rules, frequency limits, and visitor behavior can all affect how often visitors even have a chance to see it. That’s a question for the Ad Reach tab, which reports on what happens before a promotion is displayed rather than how it performs once it is.

Standard Promotions and Ad Reach answer different questions: Standard Promotions tells you how a promotion performed when it was shown. Ad Reach helps show how much of your traffic progressed far enough for a promotion to have an opportunity to display and where that opportunity was lost.

Exporting your data

SiteSqueeze includes a CSV export of Performance data for analysis outside WordPress, scoped to whatever date range you currently have selected.


SiteSqueeze is coming soon. I’m building a WordPress plugin to help marketers promote their own content, offers, and important pages more effectively, with clearer visibility into what visitors actually have the opportunity to see.

SiteSqueeze Standard Promotions: Understand What’s Driving Performance Read More »