Last updated September 2026
Creating a promotion is only half the job. SiteSqueeze also needs to know where that promotion is allowed to run.
That’s what Placements control.
A Placement connects three things: where a promotion can appear, which promotion or A/B Test runs there, and how SiteSqueeze matches your WordPress content to it. Create a Placement named “AI Articles,” target your Artificial Intelligence category, assign an AI-related promotion, and any eligible post in that category can now use it.
Your Placements page gives you a compact overview of everything you’ve set up. Expand a Placement to change its targeting or promotion.
Naming Your Placements
Name Placements for where they apply, not for what they promote:
- AI Articles
- Marketing Categories
- SEO Content
- Sitewide Fallback
This matters more as you add Placements or swap which promotion one uses.
Two Targeting Types
Custom Targeting matches specific Categories, Tags, or both. Use it whenever different parts of your site should promote different things: one Placement for AI content, another for Martech, another for a specific Tag.
All Other Content (Fallback) is your safety net. It serves a promotion when no Custom Targeting Placement matches, including for Pages or other content that doesn’t fit your Category and Tag structure.
How Matching Works
Custom Targeting uses OR logic. A post doesn’t need to match every selected Category and Tag, just one. So a Placement targeting the AI category, the Martech category, and the “AI” tag will match a post that hits any single one of those, not all three. Adding terms broadens what a Placement can match; it doesn’t narrow it.
Because a post can carry multiple Categories and Tags, more than one Placement can match the same content. When that happens, SiteSqueeze resolves it deterministically: the alphabetically first matching term gets priority. If no Custom Targeting Placement matches, or a matching Placement cannot supply an eligible promotion, SiteSqueeze can use All Other Content as the fallback when you’ve configured one.
When creating or editing a Custom Targeting Placement, SiteSqueeze shows all available Categories and Tags in the targeting selector. Terms already used by another Placement remain visible but cannot be selected. SiteSqueeze also shows which Placement is currently using them.
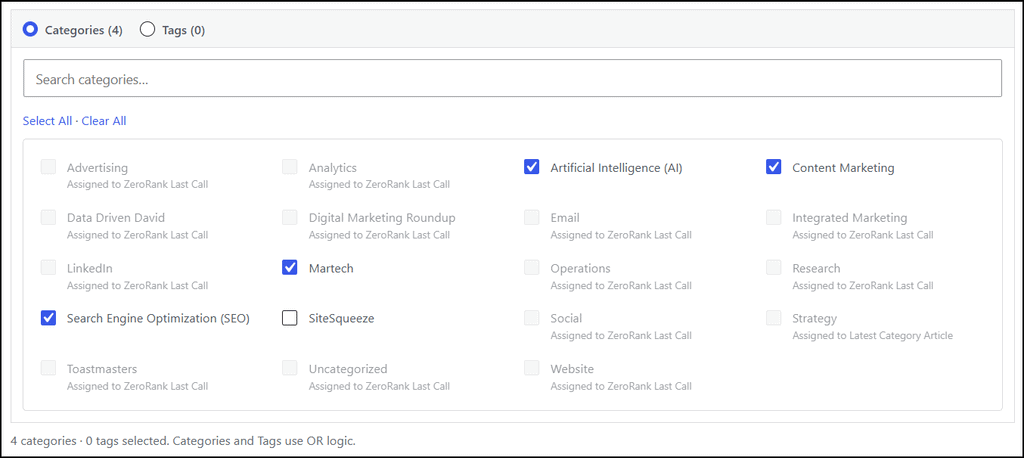
This makes it easy to see what is still available, identify targeting gaps, and avoid accidentally assigning the same Category or Tag to multiple Placements.
Use the search field to quickly find a Category or Tag on sites with larger taxonomies. Selected terms remain easy to identify, while terms assigned elsewhere are clearly shown as unavailable.
Active Campaign Coverage
This section shows how much of your taxonomy has specific targeting from an active campaign, e.g., “20 of 20 categories and 0 of 4 tags.” Expand it to see exactly which Categories and Tags don’t currently have specific targeting, which is useful for spotting gaps as your site grows.
A Category or Tag without specific targeting doesn’t mean visitors there get nothing. It simply means there isn’t a dedicated targeting rule for it. Your All Other Content fallback can still serve a promotion there.
Assigning a Promotion
Each Placement needs an experience to display. The Promotion selector organizes available options into Standard Promotions, A/B Tests, and Latest Category Article, following the same order used on the Promotions screen.
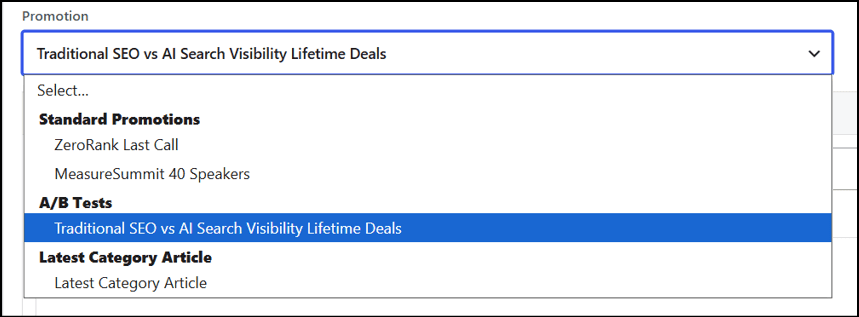
The selector focuses on experiences currently available for assignment rather than your entire historical list. For an A/B Test, assign the test itself to the Placement and SiteSqueeze handles serving its variations.
Creating and Managing a Placement
- Click Add Placement.
- Enter a Placement name.
- Choose Custom Targeting or All Other Content (Fallback).
- Choose a Standard Promotion, A/B Test, or Latest Category Article.
- For Custom Targeting, search or browse the available Categories and Tags and select the terms you want to target.
- Save the Placement.
Saved Placements appear as compact single-row summaries showing the Placement name, targeting, ad, and assigned promotion. Click Edit when you need to change the configuration.
New Placements open in edit mode. Once saved, they collapse into a compact summary so the Placements page stays easy to scan. Use Edit to change a Placement, the arrows to reorder it, or Remove to delete it.
Free supports one Placement. Pro supports unlimited (shown on the Placements page, e.g., “Pro edition · Placements: 3 of Unlimited”).
A Simple Placement Strategy
You don’t need an elaborate setup to get value:
- AI Articles — targets Artificial Intelligence — promotes an AI-related resource
- Marketing Content — targets Content Marketing, Martech, Email — promotes a marketing resource
- Sitewide Fallback — targets All Other Content — promotes something broadly relevant
That gives your priority content specific targeting while still covering everything else. As you grow, use Active campaign coverage to spot Categories or Tags worth their own Placement.
Promotions decide what you’re promoting. Placements decide where it’s eligible to appear. Keeping those separate means you can swap a promotion without rebuilding your targeting, or change where something runs without touching the promotion itself.
SiteSqueeze is coming soon.
I’m building a WordPress plugin designed to help marketers promote their own content, measure what works, and run practical A/B tests without pretending every website has enterprise-level traffic.
Join the list to know when SiteSqueeze launches.